Carnations from paper with their own hands: photo, video, master-class
 The technology of making carnations from paper is not very different from the ways of folding for flowers from fabric. But with paper it is easier to form petals of a carnation, they lie more evenly and look more magnificently.
Read the instructions from the photo and watch the video aboutfolding a carnation from the paper with your own hands, to understand all the nuances. Then go back to the instructions and follow it, making your own flower. This master class will be of interest to both adults and their children.
In order to make a paper clove yourself, you will need:
7 sheets of colored paper for records of three different colors (for example, blue, green and red);
a stapler;
Compasses or three round objects of different sizes (small, medium and large) to draw circles of different diameters.
Finished cloves will turn out to be small. In fact, it is not necessary to take paper of different colors (if, of course, you do not want to make a motley, multi-colored carnation). In the photo in the master class, it is multicolored only in order to make it clearer how exactly and in what order it should be added and fixed; one flower is best done for training.
Step-by-step instruction for making carnations from paper
1. Cut off the sticky edge from all the leaves.
2. Draw 9 circles with a compass or with the help of other objects: 1 large (blue), 4 middle (green) and 4 small (red). Small circles usually fit two on each piece of paper for recording.

3. Draw a wavy line along the very edge of each circle - after all, the petals of the carnation are not exactly even at the ends. Do not be discouraged if the line turned out not perfectly accurate: it is not required, flowers in nature are also not displayed in the line.
4. Cut out the "wavy" circles from the usual on this line.

5. Erase the remains of the pencil line.
6. Fold all the red and green circles in half. Here you can see that the circles are marked with stripes, specks and so on, but this is not necessary - they are painted in order to visually show the folding process.
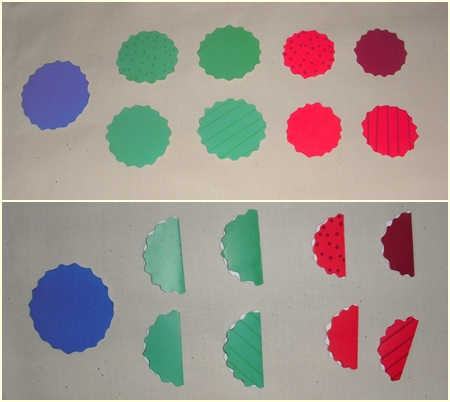
7. Put down the big blue circle (without folding it) and on it - two green folded fold lines to each other, so that together they form a whole circle.
8. You should have two green "semicircles". Bend them one more time to get a quarter, and put both these quarters on top of the workpiece. They should lie as if diagonally, diagonally from each other, so that the neighboring diagonal was empty on this layer, and that the previous layer could be seen from it.

9. You have a circle, visually composed of four different parts. In the center, there were four right angles. Now take the red little circle bent in half and put it on top - so that its fold line plays the role of a bisector for two corners (exactly as in the photo). Put next to the second red circle, bent in half - this layer should look the same as the first green.
10. Now add two other red circles, bent to quarters - also repeating the "green" layer.

11. Punch the resulting multi-layered circle with a stapler in the center (twice to make the clips cross each other).
12. Form the flower: spread all the paper petals with your fingers, bend them in the opposite direction.

13. Adjust the petals, place them at different angles to make the flower look as natural as possible.
14. If you do not want the staples to be visible, glue on top a small paper clip of the same color as the top layer (or the entire carnation, if you make a one-color version). Volumetric carnation from colored paper is ready.

Video: how to make cloves from paper with your own hands
For clarity, we recommend to watch a video master-class:
Self-made carnation made from corrugated paper
Author: Katerina Sergeenko