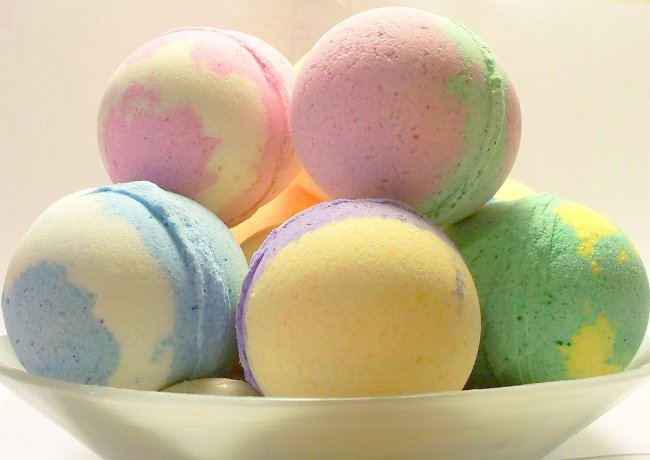
How to make colorful "bombs" for the bathroom

"Bombs" for the bathroom with their own hands - not such a strange idea. Make them colored, choosing shades especially for intimate holidays or just for the mood.
How to make colorful "bombs" for the bathroom
You will need:
- any basis for "bombs" (you can mix suchthe basis itself, but its preparation requires great accuracy, since it is associated with work with acids. The basics that you can buy in a hobby shop are usually not different in composition);
- a large glass bowl with high edges;
- 2 or more pairs of disposable gloves (not thin);
- measuring pipette;
- several separate plastic containers (by the number of colors);
- dyes for cosmetics (food colors, mixed in special proportions with glycerin, any, at your choice - two or more colors);
- hamamelis (best in the spray);
- aromamaslo (any, at your option, but not concentrate, and "safe" option for the bath);
- Molds (for "bombs" or soap - in the form of balls, opening in the middle, of any size).

Step 1. Put on gloves.
Step 2. Pour the basics for the "bombs" into a bowl of 375 grams, running it over with your hands - the mixture sometimes sticks together into clumps, and they should not be. If necessary, wipe the mixture through a sieve.

Step 3. Add the scent using the dropper. The oil should drip on 1-2 drops, immediately mixing the mixture with the other hand; if you pour out all at once, the mixture will start to hiss, reaction will start and all work will be gone. For this amount of the base, about 14.2 grams of oil should be added.

Step 4. Now divide all the substance obtained after the addition of oil, divide into as many parts as you will have flowers in the future "bomb". In this master class, it is two-color, so you need to take two containers.

Step 5. Drop 4 drops of dye of the same color (here - blue) into the first container and mix thoroughly. Do not remove the gloves! If you mix without them, wash your hands of the bright color will not be soon.

Step 6. Repeat the same with the second color (here - red), and with all the other colors, if you want to make a multi-colored "bomb".

Step 7. Take one of the containers and sprinkle the mixture with witch hazel - start with 3-4 clicks, then mix with your fingers (of course, with gloves), then add the witch hazel again. Try to spray the spray evenly and rub any lumps into which the mixture begins to stray.
If you have a liquid witch hazel in a vial, and not in a spray with a dispenser, use a pipette, repeating the same procedure that was described when adding oil. The most important thing is to distribute the substance evenly.

Step 8. Repeat with the second and subsequent, if any, colors. Be sure to change gloves - otherwise colors can mix.
Step 9. Check the consistency of the mixtures - they should look like wet sand by stickiness and density. If the goal is not achieved, continue to spray witch hazel.

Step 10. Now take one half of the mold for the "bomb", scoop up a little mixture and put it inside, tightly pressing it against the walls of the mold with your fingers.

Step 11. Put a serving of a different color; Twist it until there are no voids between the two colors.

Step 12. Repeat, alternating colors (you can even lay out a certain pattern), until the half of the mold is filled.

Step 13. You can just fill the second half of the mold, and then put them together, but they will last longer. The faster method is as follows: after about 5 minutes, remove the hardened mixture, which has the shape of a hemisphere, and leave to dry for a day (the room should have a minimum moisture content); and later just "glue" it with the other half to get a whole "bomb".

After that, you can already throw it into a filled bath.