Crafts for the feast of autumn: step by step photo-instruction

Look at this fascinating mantelpiece with an autumn composition. This is an excellent piece of interior, creating a sense of celebration, despite the withering of nature and the approaching cold.
We want to share with you a piece of goodmood and give you the opportunity to recreate such a miracle at home. Our composition is made up of handicrafts, executed at different times, and the construction of an exact copy will take quite a long time.
Therefore, we decided to present you every detail of it, so that you could evaluate your strengths, possibilities, and in accordance with this choose and do what you more like.
Some things, such as a wreath, a lantern,candlestick or decorative plate are not handicrafts and are bought ready-made in different places. A little imagination - and they perfectly fit into the big picture. The same details as a shelf in a frame with a window or a box with autumn vegetables are completely our job.
Candlestick with a natural material candle

Necessary materials:
- Ancient candlestick;
- Form candle;
- Sprigs berries and leaves;
- Scotch.
Instruction:
Making a candlestick is very simple. All that is needed for this is to wrap the branches with berries around the top of the candlestick and fix it with scotch tape.
Decorative plate

To decorate a decorative plate "antique" you can put on it a quote, an adage or just a favorite expression.
Necessary materials:
- Decorative plate "antique";
- Vinyl adhesive film;
- Cutting plotter.
Instruction:
Decide on what saying you would likesee on the decorative plate. Then use a plotter and vinyl tape to make letters (you can make it to order). Gently paste the letters on the plate.
Shelf in a frame with a window in the background

This is an unusual idea, right? Shelf, on which you can put any object, enclosed in a frame, accentuating on this subject attention. A shelf, a frame and a stylized flashlight were purchased at the store, so if you want to repeat our experience, find something similar in your stores. The decorative window in the background is a stroke finishing the picture, made completely by hand.
Necessary materials:
- Flat wooden slats of different widths;
- Hacksaw / Slot and Stitch;
- Joiner's glue (in extreme cases, you can use hot glue, but the connection of parts will not be so strong);
- Sandpaper;
- Glass;
- Paint;
- Putty or putty for wood;
- Stain or distressing ink.
Instruction:
1. Decide how big your window will be. If you do not want to use a glass cutter, the best solution is to fit the "window frames" to the size of your existing glass. Cut the wider rack into four pieces using a spline and a chair.
2. Connect the cut pieces and make sure that their angles coincide.
3. Measure the distance inside the frame and divide it in half. Based on the value obtained, cut four parts of the narrower slats. Cut the inner edges of the parts so that they converge at the center of the frame at an angle of 45 °, as shown in the figure.
4. Align the cut pieces and make sure they fit together.
5. Glue the inner parts with joinery glue, then glue the "window frame" itself and glue the inside of it.

6. Fill in the blanks with putty or putty for wood. We used for this putty white. Allow the "window frame" to dry before proceeding with the next steps.
7. Paint the "window frame".
8. Apply a transparent waterproof sealant with small droplets around all parts of the frame from the back.
9. Take the glass and press it against the sealant. When the sealant dries, it will hold the glass in place.
10. "Old" the window. Scratch the paint in some places of the frame with sandpaper, and then walk on them with stain or distress ink. So, the "window" is ready, we set it on the shelf close to the wall, and in front of the "window" we put the flashlight. A pair of yellowed leaves completes the autumn image, and the dark frame, in which the composition is enclosed, attracts the eye.
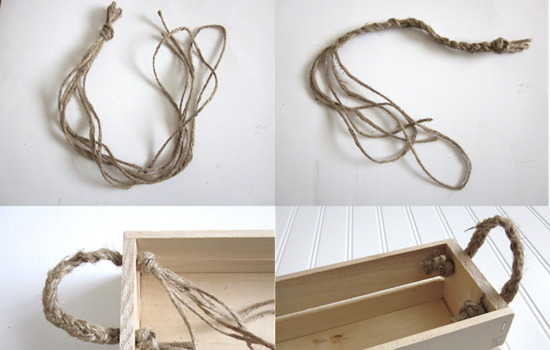
Box with autumn vegetables

We did not find in the stores long narrow boxes that looked good on the mantelpiece and could fulfill our idea, so we had to create a box for vegetables with our own hands.
Necessary materials:
- Flat wide slats;
- Pine board (approximately 1cm thick, 10cm wide and 90cm long);
- Joiner's glue;
- Twisted jute rope;
- Drill;
- Building stapler (optional);
- Hacksaw and stool.
Instruction:
1. Cut a wide strip into four identical pieces of the correct length (for the front and back of the box).

2. Cut a piece of pine board, equal to the length of the parts of the rails (for the bottom of the box), and two parts of the board, equal to the two-fold width of the rails (for the side parts of the box). Focus on the photo.
3. In each of the side parts of the box, drill two holes to insert the jute rope into them.

4. Assemble the box and make sure that all the parts fit together.
5. Apply glue to the edge of the board at the bottom of the box and glue the side pieces to it. You can use a stapler to additionally secure the parts of the box.

6. Apply glue to the edges of the side parts and the base of the box and attach the front and rear parts to them (see photo). If desired, also use a stapler.

7. If the jute rope is thin, twist into three folded twice its length, then drill into the drilled holes on the sides of the drawer (see photo). Tie knots from the inside of the drawer. 8. Paint the box with stain. After the box has thoroughly dried, fill it with vegetables. Use moss as a filler. As a decoration, use pine cones, twigs with berries and leaves.
Author: Masha Larina