How to make a bird application from colored paper, master class. Application of birds for children, step-by-step photos

Application - an excellent tool for developmentchild. With its help you can not only develop the child's creative abilities, but also begin to study the colors, forms, design principles and even design. Here such a simple application of a bird from geometric figures is available even for a two-year-old child.

Just need to pre-cut the componentspart and together with the baby put a bird together. You can not even glue. It is an opportunity in a game form to memorize geometric figures: a circle, a triangle, a rectangle. And also, the main colors, the principles of the body structure of the bird: head, trunk, wings, tail.

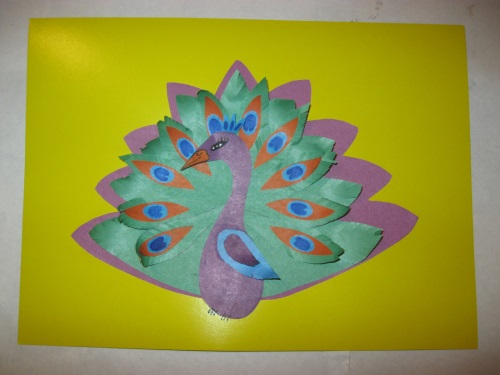
With older guys, you can try to createmore complex voluminous application, for example, peacock. We bring to your attention a master class with step-by-step photos, how to make an application of a fairy peacock made of colored paper. For greater clarity, we also provide video.

Necessary materials:
colored paper (blue, purple, green and orange);
sheet of cardboard;
PVA glue;
scissors;
blue and black markers;
simple pencil for a contour of details.


From the scheme we cut out the detail "1 - tail base", we circle it on a sheet of purple paper, cut out, we get the base of the peacock tail.

We take a sheet of cardboard, better - a bright, contrasting color - in our case - yellow, glue the host in the center.
Next, we cut out the second part of the tail - smaller, we trace on a sheet of green paper, on the contour - we cut out, we get one more detail of the tail.
Then - with small incisions, create a thin fringe around the circle, and twist it with scissors, as shown in the video, to give the volume.
Pay attention that it is not necessary to press a paper to scissors too strongly, it is possible to tear. To bend the workpiece to the front side, it should be curled from the inside.
When the second part of the tail is ready - we glue with glue only its middle, and then paste it on top of the violet billet. Should be a double tail.
,
Now make feathers. Take the detail of the pen number 1, add the green paper accordion, apply a pen to it, circle, then cut.
A little trick to not cut the fringe on each feather separately, just do not cut the workpiece to the end, we make the fringe on all the feathers at once.
Further, by the same principle, we cut out the detail of pen No. 2 from the orange paper.
Detail of pen number 3 of blue paper - cut out the same.
Thus, each peacock feather will consist of three parts.
We collect our feathers. Previously, on each blue detail, draw a characteristic "peacock eye" - an unclosed circle - in a dark blue or purple felt-tip pen. Fold the pen as shown in the video.
Next - all the feathers are curled with scissors. Please note, before this, the parts must dry, otherwise the glued parts may become unstuck or move away. For this application we need 10 feathers.
Now it's time to form a tail. Each pen is spread with glue up to half, and we put it between the feathers of the tail-base, creating an additional volume.
In this way we form the entire tail of the peacock.
It's time to cut out our head and body for our peacock. The corresponding part is drawn on purple paper and cut out.
You need to decorate the peacock, make it a beak,a crest, draw or cut an eye out of paper. This can be done at the discretion of the child. We drew our cilia with cilia and slanting eyes, the beak was made orange, and the crest was blue.
Now glue the trunk on the tail. It should protrude slightly from below and close the joints of feathers. For the sake of convenience we glue with glue only the lower part of the trunk, up to the neck, glue. Then - a little glue we put on the head, near the tuft, glued. Beak - do not glue, not to crush feathers.
We make a wing. Cut out the blanks of blue and violet paper.
On each - cut the fringe, curling in a familiar way and glue.
Now it remains only to glue the wing of our peacock. We spread the glue in half, to create an additional volume. The application of the bird is ready.

This application is just an example, it can be complicated,making all layers of the tail of individual feathers, or simplify, cutting out the third detail - solid, and curl on the principle of the second. You can change colors, add other elements of decor - sparkles, patches and so on. Creativity together with children always brings positive emotions from the process and pride in the work done.