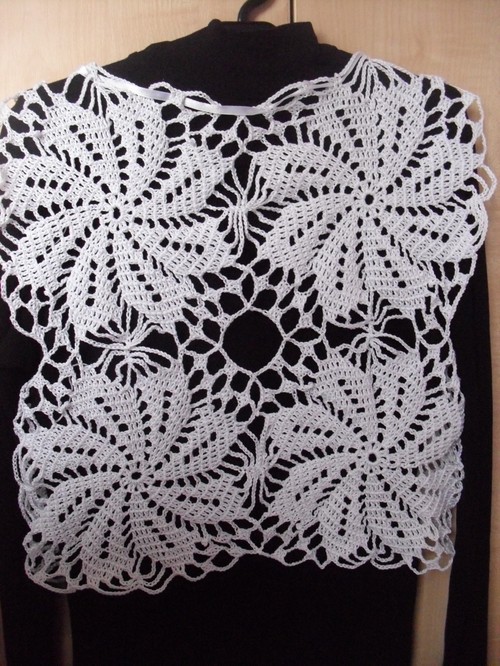
How to tie a fishnet summer vest with a crochet. Master class on crocheting a summer vest

An openwork vest, crocheted - an integralpart of a female summer wardrobe. He adds an image of grace. The process of creating a summer vest is quite simple and does not require any serious knitting skills. Detailed photos and instructions of our master class will help you to understand the difficult moments. It is only your desire and very little time.
yarn "Yarnat Begonia" (100% cotton, color: white (1000)). Consumption of yarn - 150g .;
hook number 2;
scissors;
satin ribbon 0.3-0.5 cm wide, white - 1.5 m;
knitting density: 3 sticks with crochet per 1 cm. knitting;
the size of the vest: 42-44.
Master-class: how to knit an openwork summer vest crochet
The openwork waistcoat consists of eight separate elements: four elements for the backrest and four for the transfer. The length of the side of the main element (square) is 20cm. We knit the constituent element according to the following scheme.

To the note: to make the pattern smooth, without displacements, you need to knit stitches with a crochet directly into the column of the previous row, and not into the upper hinges of the column.
The scheme consists of 12 rows. Each stage of the mating of the element is shown in detail in the photo.


The first element is knitted completely, that is, all 12 rows, and the second and subsequent elements - up to 11 rows inclusive. The twelfth row of subsequent elements will be a connecting one.
Back
For the backrest, we need to link 4 elements and join them into two rows of two elements, so we get a square with a side of 40 cm.
Elements are connected with each other as shown in the video.
This is how two components are combined together.
In the same way, we attach two more elements. Back of the waistcoat is ready!
Before
We begin to make the transfer. For this we need four composite elements. We begin to attach the element from below.
We attach the second composite element from above: we begin the connection from the shoulder (the second element of the transfer and the back), then we tie the side.
Then we connect the second element to the first one again.
We finish knitting by tying the armhole armhole.
The connection of the transmission elements with the backrest, as well as the connection diagram of the parts are transmitted to each other on the video.
.
The left side of the transfer is ready.

Similarly, the right side of the gear is sewn.
Product design
Finalize our product. To do this, it is necessary to fold the upper composite elements diagonally. Thus, we get a kind of gate.
Then stretch the satin ribbon, beginning with the edgeright diagonal of the gate to the back and on the left diagonal of the gate. The ends of the tape should be burned with a match or the flame of the lighter, so that the tape does not dissolve. The color of the ribbon depends on your desire: you can take a ribbon of the same color as the waistcoat, or you can contrast, complement the image (the color of the skirt, handbag, shoes, etc.).
The crocheted summer waistcoat is ready!