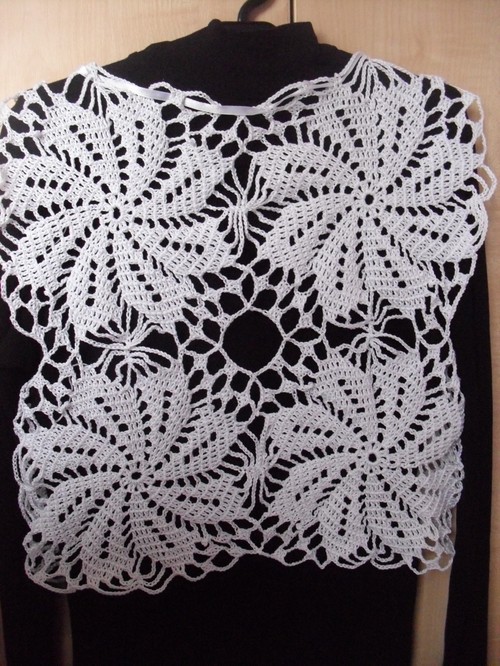
Vest with knitting needles: diagram, photo, video. Master-class on knitting a vest knitting

Vests are able to perfectly correct the shortcomingsfigures, for example, visually reduce the waist or hips. If you want to link this model to yourself, but do not know how to do it, our master class will be interesting for you. You will learn how to tie a summer vest on your knitting needles, which will decorate you and warm you. A step-by-step instruction with a photo will make the process of knitting as simple as possible.
wool (100% merino, 50 g - 175 m, 5-6 coils, depending on the density of knitting);
spokes 3 - 3.5;
hook for connecting parts;
the size is 42-44.

Note: When choosing a thread, be guided by the considerations that the material must breathe. Ideal for these purposes are natural cotton or fine wool threads. To determine the binding density, connect the square of 20 * 20 loops.

A beautiful waistcoat with knitting needles - step by step instruction
Drawing
For the main drawing of the future waistcoat we use a repeating ornament of a flower, tied with knobs, with petals from the above diagram.
The main part of the vest
We calculate 7 repeating elements, i.e. 17 p. + 15 p. + 15 p. + 15 p. + 15 p. + 15 p. + 15 p. + Leave three edge hinges on both sides.
Need to dial on the spokes 113 loops.
Next, tie 10 rows of rubber band.
With the 11 front row, we begin to consistently tie the ornament.
On a note:
the main working loops in the scheme are purl;
The pattern is fastened with facial loops;
the hem is intertwined alternately: the facial and two loops, tied face to the left; Two hinges knitted face to face and to the right;
a set of air loops: seven loops, alternating front loops and nakidy;
gray cells on the diagram - the areas of addition that are formed due to the central cap of the seven loops, which then close on the sides of the ornament and do not affect the total number of loops;
The knobs are cut out of five double sticks, which are then knitted together.
It is necessary to tie 6 columns of the ornament.
Starting from the seventh column, you need to close 2 loops on each side.
Next, the number of elements of the ornament should be reduced to 4, removing the central and two side.
Neck
Having reduced the loops in seven rows on both sides, i.e. through 14 loops, you need to split the knitting into 2 parts and start closing one loop from the middle, forming a neck. Because the number of loops was initially odd, for the first time, close the 2 loops for one side.
To tie the neck of the waistcoat with knitting needles on both sides, closing in four rows one loop.
Next, we untangle two more rows of the ornament, and we knit 15 rows with purl loops.
Starting from row 16, you need to divide the number of loops by 3 and close in three stages.

Back
For the backrest, you need to collect 113 loops.
Knit with purl loops, using a hem from the ornament.
Repeat all actions without tying the necks.
We connect the parts of the waistcoat
Connect the details of the vest to the front side. Starting from the bottom, using a hook, we sew the canvas.
In the same way connect the details of the hangers.
In order to attach the neck to the waistcoat, it is necessary to loop each loop of the throat with a loop on the spoke.
To rub with an elastic band of 4 rows, 5 close very freely to close.
Repeat this process for both sleeves.
A smart waistcoat tied with knitting needles is ready!