How to make a little book, a master class. Cognitive book-baby with your hands, step-by-step photos, video

Bright cardboard books cause delight in children,help develop attention, introduce the whole world of shapes and shades. But, as often happens, the new book bothers, and the child in a few hours already wants another. And if parents approach the issue creatively, they will be able to pamper the child with bright crafts. After all, having allocated a little time, it is possible to organize joint exercises, during which the child learns how to make a book independently. Such lessons can turn into exciting master classes, where a young master, armed with glue-pencil, will be able to design several pages. Parents will also need to prepare the foundation for creativity, cut out the necessary number of figures and, of course, monitor the process. In our article you can find a master-class with step-by-step photos, how to make a cognitive book-baby with your own hands.

Necessary materials:
Cardboard colored - 2 sheets;
Colored paper;
High-quality glue-pencil;
Threads.
Scissors;
Strong long needle;
Ruler;
Screws for metal;
Pencil;
Pattern patterns.
How to make a little book - step by step instruction
We make the drawing of future pages - we divide each sheet into 6 parts.
Carefully cut the cardboard in the markup and suggest that the child arrange the cards, as in the photo.
While the kid plays cards, we cut out various geometric figures. We use paper of different colors.
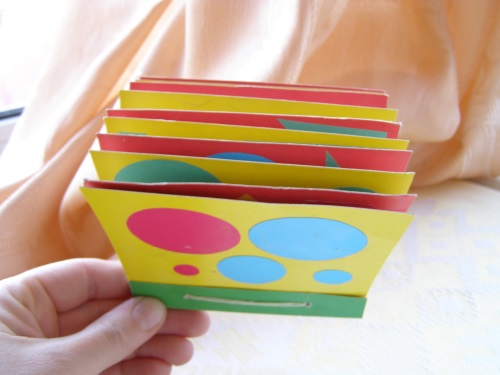
Now you can put on the table surface beforea young craftsman a special mat for needlework or just a sheet of paper and, together with him, to lay out around the carved figures. We take glue, then any page and show how its design is performed. Pay attention: you need to choose contrasting colors, explaining the rules of composing in passing. If the student is old enough, then after several co-issued cards, you can give him creative freedom. As a result, all 12 pages will be decorated with a bright applique.
From a piece of cardboard we make a template for the holes and a neat "spine" for the future book according to the scheme given.
We bend the "spine" with scissors, as in the video.
The template is also cut out of cardboard, making holes.
Using a template and a screw, make holes for threads on all prepared pages, as well as on the spine. Gently fold the cards.
Everything is prepared. But how to make a book baby, if its sheets are not fastened? The double-stranded thread is threaded into the needle and carefully collects the book for the baby. To fix the thread after the firmware, we make several knots. Cut the tail of the thread and hide the knots in the hole. With the help of a needle or scissors we work on the folds of the pages and the spine. The finished product is brought to its original position.
Ready to use a bright manual for learning shapes and colors. You can also count the number of elements on each page with the child.
Developing manual made by own hands, will bring more joy than the printed edition. Moreover, such a children's master class will bring a lot of positive emotions to all its participants.