Wet felting
 The country of the Soviets has already told you recently about the technique of dry felting. But if there is a dry felting - it must be wet? Really, wet felting - this is another kind of felting. The technique of wet felting makes it possible to produce large flat felt cloths, which is difficult to do, using the technique of dry felting.
 Wet felting is called so because for dumping fibers of wool water, or rather - soap solution is used. There was a wet felting, or felting, incountries where sheep and goats were domesticated. There is a legend about the occurrence of wet felting, referring us to biblical times. It says that on the Noah's ark, among the other animals were sheep, who had to live in very tight rooms. The wool of sheep fell on the floor, saturated with moisture, and they also stamped on it with hoofs. When the Flood was over, and the sheep left the ark, the first felted carpet remained on the floor.
For wet felting a lot is not necessary: wool, water, soap and hands (it's not for nothing that it's called felting). But such a minimalist set was bypassed by the first freeloaders, and you can make it easier with additional materials and tools:
Wool for wet felting is thin, semi-thin and combed ribbon. Fine wool is the wool of merino, it is verysoft and light, you can make scarves out of it. Semi-thin wool is slightly rougher, it is made of hats and bags. The combed ribbon is very coarse, it is difficult to roll, it is better to add it a little at felting dense products.
Soapy solution for wet felting is done like this: A bar of soap is rubbed on a large grater andpoured two liters of boiling water. Then it is stirred, so that the soap is completely dissolved, it is infused about two hours before thickening, and then it can be used. For wet felting is suitable and ready-made liquid soap.
When the solution is ready, you can proceed to the wetfelting. Spread the litter on the table (it is better to use pimply film, it is inexpensive, reusable, it does not get stuck in the fibers of the coat). Put the film in pimples up. After determining the dimensions of the future felt fabric, mark with paper tape the outline of the product. Note that when felting wool shrinks by 20%, or even more.
On the litter, start spreading the wool. First put the main, the base layer, then the background, and the top - the picture. Wool must be laid with thin strands, overlapped, so that there are no gaps, the layers are laid perpendicular to each other. The thickness of the coat layer on all areas should be the same. Again, because of shrinkage, the thickness of the laid wool should be 3-4 times greater than the thickness of the intended fabric.
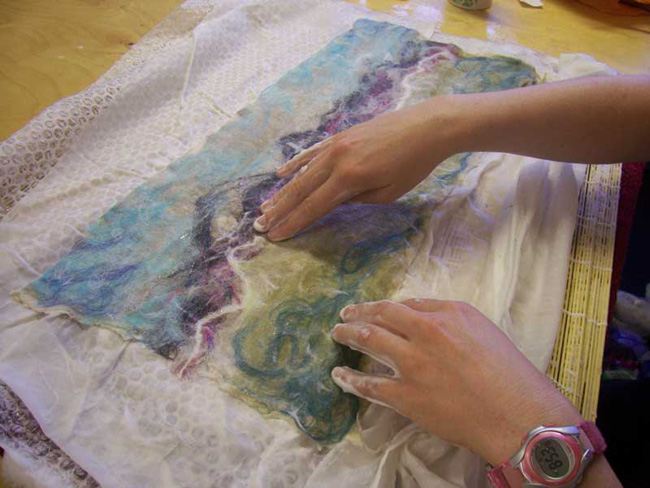
When the wool is spread out, gently wet it from the spray gun to avoid moving the pattern. Then the wet wool is covered with a net and soaked with a soap solution or a liquid soap. Blot hands, so that the wool is impregnated with the solution, you can iron it with a wooden rolling pin, but very carefully, so as not to shift the hair. Surplus water can be soaked with a towel.
Now you can start to fool around. The technique of wet felting is very simple: you just need to rub the cloth with your hands in different directions. If you put on cellophane gloves - handswill be easier to slide. Make sure that the coat is permanently soaked with a sufficient amount of soap solution. How much should I rub? They say that in wet felting there is a golden rule a hundred times - if you iron each section of the canvas a hundred times, then the wool falls. But scrupulously count is optional. If the net moves away from the canvas, and the wool is not shifted - you can gently remove the mesh, turn the canvas and roll it from the wrong side. If the canvas was well-soaked, then you can continue to wiggle it without a mesh.
Check the willingness of felt can be, gently pulling the hair up. If the product is rolled up, then separate strips will separate, and not entire strands. When you have finished wagging, rinse the productWarm water to wash out excess soap solution. From too cold or too hot water, the product can lose shape and shrink. To twist the finished cloth too it is not necessary, it is better to put it on a lattice and to allow to drain.
The finished canvas, made in the technique of wet felting, can be used as a rug, panel, shawl or scarf, or cut out on clothes. Wet felting is a simple technique that allows you to create great things from felt.

</ p>
For wet felting a lot is not necessary: wool, water, soap and hands (it's not for nothing that it's called felting). But such a minimalist set was bypassed by the first freeloaders, and you can make it easier with additional materials and tools:
- litter under the future product (corrugated rubber mat, bamboo tablecloth, packing film with pimples)
- spray gun with water
- Mesh (mosquito net, mesh for plaster or old tulle)
- cellophane hand gloves (optional, but if you care about the condition of the skin of your hands, it is desirable)
- wooden rolling pin
- Scotch
- terry towel
Wool for wet felting is thin, semi-thin and combed ribbon. Fine wool is the wool of merino, it is verysoft and light, you can make scarves out of it. Semi-thin wool is slightly rougher, it is made of hats and bags. The combed ribbon is very coarse, it is difficult to roll, it is better to add it a little at felting dense products.
Soapy solution for wet felting is done like this: A bar of soap is rubbed on a large grater andpoured two liters of boiling water. Then it is stirred, so that the soap is completely dissolved, it is infused about two hours before thickening, and then it can be used. For wet felting is suitable and ready-made liquid soap.
When the solution is ready, you can proceed to the wetfelting. Spread the litter on the table (it is better to use pimply film, it is inexpensive, reusable, it does not get stuck in the fibers of the coat). Put the film in pimples up. After determining the dimensions of the future felt fabric, mark with paper tape the outline of the product. Note that when felting wool shrinks by 20%, or even more.
On the litter, start spreading the wool. First put the main, the base layer, then the background, and the top - the picture. Wool must be laid with thin strands, overlapped, so that there are no gaps, the layers are laid perpendicular to each other. The thickness of the coat layer on all areas should be the same. Again, because of shrinkage, the thickness of the laid wool should be 3-4 times greater than the thickness of the intended fabric.
When the wool is spread out, gently wet it from the spray gun to avoid moving the pattern. Then the wet wool is covered with a net and soaked with a soap solution or a liquid soap. Blot hands, so that the wool is impregnated with the solution, you can iron it with a wooden rolling pin, but very carefully, so as not to shift the hair. Surplus water can be soaked with a towel.
Now you can start to fool around. The technique of wet felting is very simple: you just need to rub the cloth with your hands in different directions. If you put on cellophane gloves - handswill be easier to slide. Make sure that the coat is permanently soaked with a sufficient amount of soap solution. How much should I rub? They say that in wet felting there is a golden rule a hundred times - if you iron each section of the canvas a hundred times, then the wool falls. But scrupulously count is optional. If the net moves away from the canvas, and the wool is not shifted - you can gently remove the mesh, turn the canvas and roll it from the wrong side. If the canvas was well-soaked, then you can continue to wiggle it without a mesh.
Check the willingness of felt can be, gently pulling the hair up. If the product is rolled up, then separate strips will separate, and not entire strands. When you have finished wagging, rinse the productWarm water to wash out excess soap solution. From too cold or too hot water, the product can lose shape and shrink. To twist the finished cloth too it is not necessary, it is better to put it on a lattice and to allow to drain.
The finished canvas, made in the technique of wet felting, can be used as a rug, panel, shawl or scarf, or cut out on clothes. Wet felting is a simple technique that allows you to create great things from felt.

Read more:

A gift for yourself on the New Year: a cover for a phone in the felting technique, a master class with a photo

A gift for yourself on the New Year: a cover for a phone in the felting technique, a master class with a photo

A gift for the New Year with their own hands: felting a purse, a master class with a photo

A gift for the New Year with their own hands: felting pinets, master class with photo

Dry felting for beginners

How to decorate felt boots

Felting flowers from wool

Beads of wool

Wet felting

Dry felting for beginners

How to decorate felt boots

Felting flowers from wool

A gift for the New Year with their own hands: felting a purse, a master class with a photo

A gift for the New Year with their own hands: felting pinets, master class with photo