How to draw a school in pencil and colors to a child 7-8 years old and a 5th grade student - How to draw a teacher: step-by-step instructions for beginners

Drawing is an enticing and fascinating occupation. Everyone who has ever tried to reflect his own fantasies with pencil or paint on paper will agree with this. For beginners, visual arts are given easier, simple schoolchildren - more difficult. But everyone who is full of inspiration and faith in himself, the drawing will turn out to be bright, interesting and unusual. Starting art classes is always better with what is familiar: from simple colors, pets or simple illustrations on the theme: "school." For children, they will become an excellent hand-craft for memory, and for adults will cause a warm nostalgic mood. But how to draw a school to not miss anything, and all the details were in place? The ideal option is to use our step-by-step instructions with photos and videos. See how to draw a teacher, class, school yard and stuff in our today's article.
How to draw a native school in simple pencil step by step - instruction for children 7-8 years old
Draw a school in stages with a simple pencilnot at all difficult. You can transfer on paper your attitude to your favorite school, drawing a classroom, the first teacher with a pointer in his hand, a bell with a ribbon or a briefcase with a textbook. And you can simply draw your city or village school with all its nuances and features: wide front doors, tall window arches, traditional balustrades and a multi-stage porch.
Read and see how to draw your own school in simple pencil in stages, in the instructions for children 7-8 years old.
Necessary materials for the picture "Native School" with a simple pencil for instructions for children
sheet of white landscape paper A4
sharpened pencil
eraser
ruler
Step-by-step instruction for creating a "Native School" drawing with a pencil for children 7-8 years old
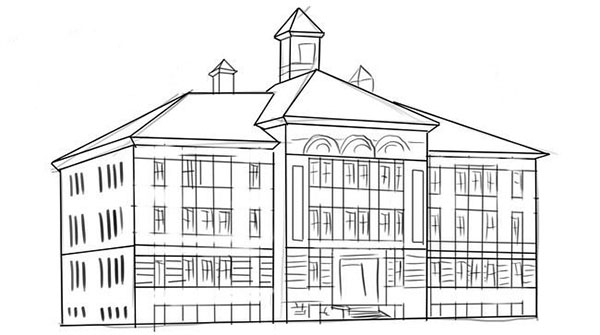
Clean sheet of landscape paperhorizontally on the work surface. In the central part, make a small outline of the outlines of the building. Do not draw a line too hard to be easily erased afterwards.
Draw smooth lines, horizontally separating the roof and vertically projecting parts of the outer walls.
At the next stage on the front facade of the building draw horizontal lines along and across, leaving a small distance between them. These lines will become a graphical layout of the windows.
Between the three blocks of squares draw large "front windows."
Draw small windows, erase all unnecessary lines. On the end wall, paint the windows with vertical stripes.
At the last stage, draw your own school details: the front entrance with a porch, a wide door, small ledges on the walls, drainage and other details specific to your school.
How to draw a school of future paints to a child in grade 5

What does the school of the future look like in your imagination? In which classes would you like to study? What is the school yard filled with, in which new schoolchildren will happily spend time? Have you already thought about this? It's time to reflect your fantasies on paper and draw a school of future paints to a child in grade 5. With a large and friendly front door and wide bright windows, with motley curtains or flower pots, with a traditional low parapet or a colorful floral greenhouse. How to draw a school of the future paints a child in grade 5, the artist himself will decide.
Necessary materials, for drawing "School of the future" with paints
sheet of white landscape paper A4
simple sharpened pencil
watercolor honey colors
brushes artistic
eraser
A step-by-step instruction on how to paint a future school for a child in grade 5
Put a sheet of landscape paper horizontally. In the middle, draw a small rectangle, stretched out in the sides. Add both sides along a narrow rectangle, projecting just below the central one. So you will get the outline of a school building with an--shaped layout.
Through the whole building draw two straight horizontal lines, dividing the building into three equal horizontal parts.
On the lower "floor" in the center of the image of a two-folded front door.
Add the front doors of the details: visor, threshold, door handles and steps.
On the central building of the building, erase the old lines and draw seven new ones, dividing the wall into flat horizontal strips.
In each second strip draw a small vertical stripes that form squares-windows. Erase the remaining lines.
Similarly, draw long horizontal strips on the side shells.
Add vertical lines to make the windows. Remove all unnecessary ones.
In each window, move the window sill and the window frame. Add a suitable roof to the school. On separate windows you can draw curtains or flower pots with small plants.
Keep in mind! If desired, you can add reliefs to the walls (tiled, brick, etc.) For this, it is enough to draw a thin grid on the flat surfaces of the facades, barely pressing a pencil.
Using honey colors and thin brushes, paint the school of the future in your favorite colors. Initially, the walls of the facades and the background, and after complete drying - small details of doors and windows.
Detailed instructions how to draw a physical education teacher, school yard or class, for beginning artists

Each novice artist depicts a school oncanvas in their own way: someone - in the form of a cozy "watercolor" school yard, someone embodies it in the image of a small schoolboy with a heavy knapsack. We offer all young talents to paint their own class with strict rows of old desks and a wide neat board. Detailed instructions how to draw a physical education teacher, school yard or class, for beginners, look for below.
Necessary materials for the drawing "Native class" for novice artists
sheet of white landscape paper A4 size
sharpened pencil
eraser
ruler not less than 10 cm
Detailed instructions for beginning artists how to draw a school class
That the classroom is ideally located onalbum sheet, put it on the table horizontally. Divide the canvas into several zones (floor, ceiling, wall, etc.), as in the photo, using a simple pencil and ruler.
At the second stage, draw a diagram of the arrangement of rows with desks, windows on the walls, a blackboard.
Begin drawing lines of desks with highlegs, leaving an equal distance between them. Do not forget! Objects closer to us always look larger than those that stand in the background. Even if in reality their dimensions are the same.
It's time to add chairs to the desks and place additional fields around the chalkboard.
At this stage, look at the windows: draw the window frames, add curtains and cornices. Draw a relief on the ceiling from the ventilation system, ceiling beams, etc.
Just below the window, place the radiators with narrow oblong sections. Erase all auxiliary lines.
If there is a desire and inspiration, drawin the foreground of two schoolchildren, leading a simple dialog. With such detailed instructions how to draw teachers in physical education, school yard or class, beginners will not have any problems.
How to draw a teacher at a board in pencil step by step for children of the senior classes

Unlike adults, it is difficult for adolescents to realizethe value of everyday teaching work and the global influence of educators on the fate of each of us. But it is not for nothing that they say that a teacher is able to make a man out of a monkey. To appreciate the hard work of teachers can only be at an informed age, assuming responsibility for someone else. In the meantime, adolescents have to learn to read, write, tinker and, of course, draw.
Do not waste time, do creative work! Use our instructions how to draw a teacher at the blackboard in pencil step by step for high school students.
Required materials for drawing "Teacher at the blackboard" in pencil
sharp pencil with soft stem
eraser
sheet of white landscape paper A4 size
On a note! Children in high school can draw teachers on the board on any toned paper. The teacher's illustration on a yellow, pale blue or light lilac background will look brighter and deeper.
Step-by-step instruction for creating a pencil drawing "Teacher at the blackboard" for high school students
Put a sheet of paper horizontally. In the central part, choose the place where the teacher will stand. Draw a contour of the body and head. On both sides of the torso, draw a diagram of the shoulder joints.
Next draw your hands in a natural position, representing the elbow joints in circles, and the rest - straight lines.
Add to the extremities of the volume. In the left hand, "insert" a pointer.
Proceed to detail the image: draw the collar of the outfit and the right sleeve of the jacket.
Draw the teacher's suit in details - the second sleeve, folds and pockets on the jacket. Draw the hands, clearly drawing all the fingers.
Point your pointer more clearly in your hands, erase all auxiliary lines in the teacher's outfit.
Begin drawing the lower part of the head: draw a chin, nose, lips and a small podubnuyu hollow.
Dorisuyte completely face and ears. Pay special attention to the eyes and eyebrows.
Make the teacher a neat hairstyle. Let the hair be gathered into a tight bundle at the back of the head.
In the background, draw a large rectangle blackboard. Write a primitive mathematical example on the work area.
Erase all the remaining auxiliary lines, bring the picture to the ideal. Shade the outfit of the teacher with a soft pencil, add glare to the eyes.
From our useful article, you probably learned how toDraw a school, teacher and classroom with pencil and paint. Detailed step-by-step instructions with photos and videos will be useful not only to children of 7-8 years old or pupils of grades 7-11, but even to beginning artists.