How to make a herbarium with your own hands. Herbarium for the Junior School

The word "herbarium" is translated as "herbalist". This is a collection of dried samples of flora, decorated in a separate album with a mention of the genus of the plant. The type, Latin name and description of the exhibit are indicated on the reverse side of the sheet, preferably in printed form. However, if you just want to keep beautiful leaves for memory, you can not adhere to the rules. And in order for the herbarium to please you for many years, you should learn how to collect and dry samples of the plant world. That's what we're gonna do. Today we will learn how to make a herbarium with our own hands. By the way, our master class is suitable for the pupil of the primary school and their parents.

Which leaves are better to make a herbarium?
The choice of plants depends on your goals, climatic conditions, geographical latitude and the type of your herbalist.
There are herbariums:
special, for educational purposes;
systematic when samples are made in alphabetical order;
thematic, for example, herbarium from weeds or medicinal herbs;
Floral: with plants collected in a certain area;
Periodic, when the samples are classified by genera and botanical families, etc.
If you are just keen on creating a collection of herbs, trust your intuition and choose those plants that will most attract your gaze with the shape of their leaves.
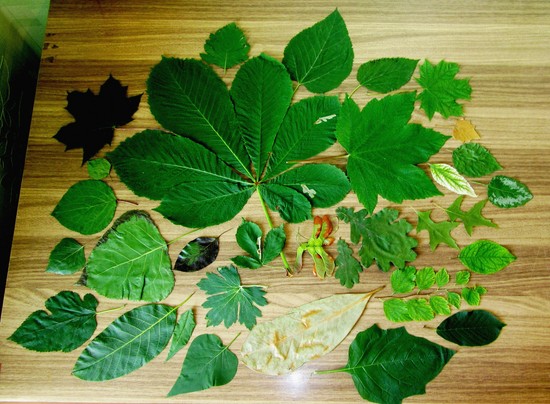
In this master class are the leaves:
poplar, maple, linden, chestnut;
roses, lilacs, jasmine, acacia;
apricot, cherry, cherry plum, red currant, cherry plum, barberry, grape, walnut, mulberry and hazel.

How to make a herbarium with your own hands - step by step instruction
Features of the collection of plants for the herbarium:
The leaves must be dry, so collect them better if the weather is appropriate.
Suitable samples without visible deviations, not damaged by insects and mushrooms.
If plants from one population have noticeable differences, then it is possible to present samples with different forms.
A small plant can be represented in the herbarium together with the root system.
When collecting leaves from trees and shrubs, it is desirable to tear flowers or fruits.
In order to make the herbarium ideal, it is desirable to collect plants with a margin. This will be useful if the sample is damaged during transportation or if its color is distorted after drying.
If the plant has a thick stem or root, it is better to cut it along in half.
In one file it is desirable to lay plants of the same species. If the sheet is large, you can take from 1 to 3 samples, if small - enough to fill a sheet of paper in the album.
To collect samples you will need a herbarium folder, a ballpoint pen, a lot of unnecessary newspapers and a scoop, in case you need to dig a plant with the root.
Collected samples should be carefully wrapped in a sheet of newspaper, put in a file and identified in a folder so that they are not wrinkled.

Herbarium folder can be bought at the officeshop or make it yourself from two sheets of A4 or A3 cardboard, depending on the size of the leaves that you plan to assemble. For this you will need a punch. Between sheets of cardboard it is necessary to insert sheets of Whatman and punch holes in the center of the folder. You can fasten all this with a thin tape or wire. On the side of the file, you can write the name of the ripped plant, the place and time of collection of the sample.
How to Dry Herbarium
For drying at home, samples of herbs can be put between pages of thick books, pre-laying between them sheets of newspapers or unnecessary thick paper.

In order for the leaves to dry faster, it is necessary to change the paper 2 times a day to dry, since it absorbs moisture very quickly.

In botanical laboratories, a special press with metal mesh is used to level the samples. And at home thick books fit, between which you need to pinch the plants.

In the cold season, samples for the herbarium should be dried near the battery or heater.
Useful tips for drying and storing plants:
In order for a flower with a blue color, for example, chicory, to retain its original color, it must be dipped for 30 seconds in denatured alcohol.
To make the leaves denser, they must be placed in a solution of water and PVA glue in a ratio of 1: 4.
If the plant after drying keeps the form and is directed strictly vertically, then you have done everything right.
The best place for storing an album with a herbarium is a closet in a dry light room.
Alternative methods for drying samples:
Iron the sheet, wrapped in thick paper, with an iron in a gentle mode. Repeat the procedure in a few hours. The main thing is to make everything very carefully, otherwise the copy will lose its natural color.
If the shape is more important to you than the color of the leaves,then pour glycerin into the water heated to 60 degrees in a 1: 3 ratio. Dip into the container with the resulting solution leaves and leave for 2 days. When the samples darken, you can get them, dry them and put them under the press.
How to make an album for herbarium
There are different design optionsalbum-herbalist. You can make it with your own hands from the beginning to the end, you can create an original inside, or you can just buy a ready album and paste samples there.
Option 1: Album yourself
Tools for registration:
old album for drawing;
hole puncher;
PVA glue;
household gloves;
scissors;
sheets of dense paper, preferably format A3;
sheets of tracing paper or clerical paper;
25 cm tape or braid;
color marker;
ball pen.
Step-by-step instruction
In order to issue a herbarium with your own hands, cut off the cover from the used album for drawing, or buy 2 sheets of A3 thick cardboard.

Put between the cardboard sheets of Whatman. Alternating inside the album is Whatman and Tracing Paper, make holes with a punch.

Cover the album, as fantasy tells you. For example, you can make the inscription "My Herbarium" and draw a pair of maple leaves. You can attach an album using a tape.

You can sew samples with green thread, or you can glue with fish glue, narrow strips of paper, PVA glue and others.

Option 2: creative design
You can buy a finished album and create a creativehim. For example, experiment with the leaves, unfolding them in a different order, and draw a flask or vase to them. In order not to be mistaken, sketch with a simple pencil.

Then move the drawing with the marker and add the seeds or leaves to complete the composition.

In this form, you can decorate the entire herbarium, and you will get unusual pictures of the leaves.
Option 3: design in a folder-folder
Making a herbarium in a folder with files is more economical than buying an album. In addition, you can always swap files and each time to make a variety of viewing herbarium.


Leaving leaves brings peace. Collecting "herbalist", you not only spend time in the fresh air, but also learn a lot of new and interesting about the plants of your land. Choose the way you like and enjoy the creation of a herbarium for a junior school or home collection.