How to make a creative card with your own hands - photo master-class

Lovely souvenir made by own hands, sometimesis better than the most expensive and pompous gift. But what if you do not have enough imagination for original crafts? The answer is simple - make your own hands an unusual, creative postcard, which will at least be a pleasant gift for your friends and family. And to make it very simple - even if you have absolutely no imagination. Just follow our step-by-step instructions and make a postcard on the suggested template!
You will need:
- beautiful little things for the "window" (confetti, sparkles, colored paper, scraps, beads, materials for scrapbooking - everything that fits the case and looks good);
- knife for cutting paper;
- pencil;
- ruler;
- material for the window (a small bag of dense transparent polyethylene - for example, packaging from a disc or jewelry).
- thin marker;
- scissors;
- transparent double-sided adhesive tape;
- simple transparent scotch;
- colored double-sided cardboard or very dense flexible colored double-sided paper.
How to make a creative card - template and step-by-step instruction
1. Pick up the "treasures" for the window of your creative postcard, arrange them next to each other to see if they fit together well. If you hesitate in choosing a color scheme, compare the colors by the "color circle".

2. Cut out a rectangle with a size of 27 x 13 cm from the cardboard.

3. Fold it three times - as in the diagram below. The width of each section of the resulting triptych should be, respectively, 9 cm. Carefully, but with effort, smooth the folds.

4. Now you need to cut out the place for the window. You just folded the cardboard three times, you got three equal rectangular sections. Cut the place you need on the first two sections - a bag of small things will be placed between them, and they themselves are glued to hold it.
The place for the window should be square, 6 x 6 cm. There should be a space of about 2.5 cm above, and about 1.6 cm on the sides.
The fastest way is to cut the windows simultaneously in both sections: fold the third, which will be the back side of the postcard, fold the first two together and cut the square through both sections at once.

5. Using a marker, mark the polyethylene bag: you should draw a square with a side larger (about 1.3 cm) than the square window for this sachet on the cardboard.

6. Lay out all the little things in the bag, and then seal it with adhesive tape - but remember that the tape of the tape should not be wide, so as not to be visible then from the window; she must completely hide the cardboard. Tapes 2 cm wide should suffice (it turns out 1 cm from the front and the underside of the sachet on each seam).
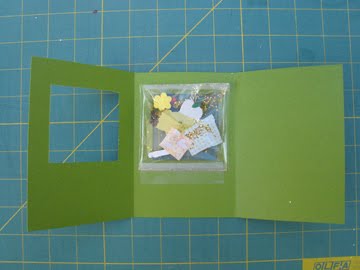
7. Put the sachet on the window of the second section and cover it around the perimeter with a double-sided adhesive tape. Make sure that the tape of this adhesive tape is wide enough and holds the bag well in its place.
Stick a strip of this tape and at the very bottom of the section.
Fold the first and second sections and make sure that they are well adhered to each other, and the bag is fastened between the windows properly.

8. Done! It remains to sign a card inside - on the third section; if you want, you can sign it in front, below the window - usually there write the name of the holiday or another occasion, on which you give a postcard.
Little tricks:
- it is better to use objects that are beautiful on both sides (for example, two-sided colored paper) so that they can be admired and when the postcard is closed and when the addressee reads the inscription inside;
- Combine large, medium and small objects in the window, do not do all the same size. Contrast always looks spectacular;
- if you want to fix objects in the window,paste a tiny piece of transparent double-sided adhesive tape on them and gently place them where they should be. But do not glue so all the objects without exception - a postcard, a picture on which you can "mix", looks much more interesting;
- if you are going to send your card onmail, put next to her in an envelope a thick piece of cardboard (so that he covers the "front" side). So the contents of the window will be protected from damage.


