Topiary with their own hands: master class, video for beginners

The art of topiary (topiary) has been known since ancient times, but today it has not lost its relevance.
Topiary is an ornamental tree that isa symbol of happiness. It is not difficult to make it yourself even for beginners. In this master class with photos and video, we will tell you in detail about the manufacture of topiary.
Step-by-step instruction on making topiary with your own hands
First step - Crown making. It is important to note that the crown is the basis of the decorative tree. At us it will have the form of a ball, although this condition is optional, you can show a personal fantasy. The base for making topiary can represent various suitable items.
The crown can be made independentlyas in the technique of papier-mâché, and with paper, neatly formed into a ball and fixed with threads. It is necessary not to forget in this blank to leave a hole for the trunk. The trunk itself will later be attached to the crown of the topiary with glue. Better, for connecting parts use an adhesive gun, building PVA or standard superglue.
Second phase - Manufacture of a trunk for topiary. So, to carry out the trunk for a decorative tree of happiness, you can use any twig or wand, the main thing - it should be very strong. Also, experts recommend using a wire bent several times, because thanks to such material, the trunk can be given various bends.
A good idea is to use original sticksCinnamon, which will give the topiary also flavor. If you took an ordinary wand, then it is desirable to decorate it, for example, with a rope, a ribbon or special threads.

It is very easy to wind the trunk of a decorative tree. You can take advantage of the colors, this will give the "desired" color.
The third stage - performance of a pot holder for topiary. As a stand, many masters recommend using standard flower pots, glasses, small cups and vases. It is important when performing a topiary with your own hands, remember that the size support should not be larger than the diameter of the base itself, i.e. crowns.
Decorate the chosen one or another capacitywith the help of beautiful fabric, ribbons, corrugated paper and thick threads. It all depends on your personal desire. To strengthen on the stand topiary will help any high-speed building material - gypsum, alabaster, cement, etc.
But in order to "plant" a tree, we recommend following this step-by-step instruction:
1. Prepare the solution from the selected material;
2. Pour it gently into the pot holder;
3. Also gently insert the decorative tree into this "ground" and align the trunk with the pot;
4. Hold the topiary until the mixture is slightly clamped;

And, of course, do not forget about the decorations of the treehappiness. "Earth" in the pot can be decorated with sand, stones or colored salt. It is better to do this at the stage when the topiary itself is installed in the pot with the mixture. This will help reliably fix these decorative elements.
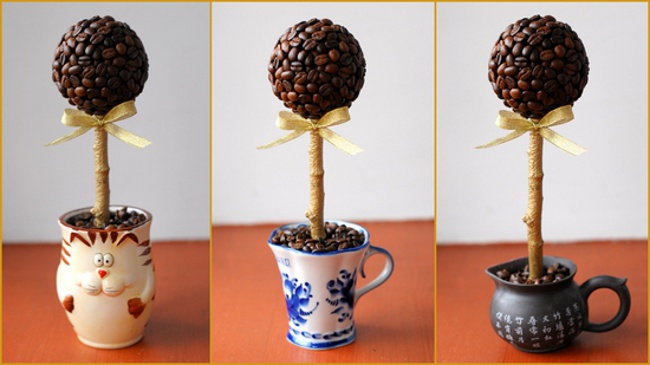
If you decide to make a coffee tree of happiness, thenTo decorate the crown, use natural coffee beans. Do not forget, before you glue them, paint the crown in brown, so that the whole composition looks harmonious, You can decorate the tree in a marine style. For this, decorate the crown with shells, starfishes and ornamental fish.
Original topiary looks from nuts. Hazelnut, sesame, pistachios - all this to help you. Many, probably, are interested in how the money tree-topiary is made. The answer is simple - this symbol of wealth is easy enough to create both from coins and from paper bills.
So, now you know how to do ityourself topiary, as in the photo, and we in turn wish that your decorative trees always delight the eye and really bring happiness and luck to the house!
Video for beginners: how to make a topiary with your own hands
Step-by-step master classes:
Author: Katerina Sergeenko