Children's crafts from color cardboard, schemes, photo
 Crafts from color cardboard deliverpleasure for both children and adults. This is an excellent pastime, which, moreover, does not inflict damage to the family budget, since most of the materials can be found at home.
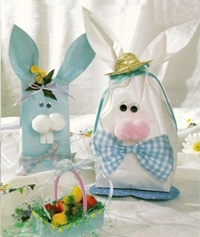
Crafts can be done just to take a child, or to a certain holiday. For example, you can make a very cute bunny that will decorate the house for Easter.
Hare - crafts made of colored cardboard
We will need:
• colored cardboard (better yellow)
• velvet paper
• Adhesive
• scissors
• felt-tip pen - blue or black
• a simple pencil
Step 1. From colored paper of yellow or any other color, we glue a cylinder 7-10 cm high and a radius of 3-4 cm. It will become the torso of the bunny. To simplify this task, you can also take a roll from under the toilet paper and pasted it with colored paper.
Step 2. Make the ears. To do this, we cut them out of colored cardboard of the same color as the trunk. The length should be of the order of 6-8 cm. Cut out and glue in the center of the ears from orange velvet paper (if the ears are yellow), the billets that repeat the shape of the ears, but smaller in size.
Step 3. Glue the resulting ears inside the finished cylinder.
Step 4. From the velvet paper of red or black, cut out the spout. It can be round, cross-oval or in the form of a heart. We glue it slightly above the middle.
Step 5. Cut out two small eyes from the white cardboard and draw a blue or black marking pen on the eye of the rabbit. We paste.
Step 6. Of white cardboard also need to cut a trapezoid shape, which will serve as a bunny teeth. Cut it vertically in half and glue it too. Muzzle of the bunny is almost ready.

Step 7. From cardboard black or dark blue color, you need to cut 6 thin stripes. This will be a mustache, which must be glued on either side of the nose for 3 pieces.
Step 8. Now from the velvet paper we make the bunny arms and legs. To do this, you will need a velvet paper of a darker or more contrasting color in comparison with the trunk. Cut out the handles. We glue together the jaws and glue the hangers to the sides.
Step 9. For the leg cut out of the velvet paper oval, which will become a heel, and three smaller circles. We glue at the bottom of the trunk first oval, and above it circles. The same is done with the second leg.
From the cardboard cylinder you can make another hare. For him, besides the cardboard, we need scissors, glue, brushes, paints and beautiful ribbons.

Step 1. We cut the cardboard cylinder into 7 equal parts and begin to glue them together. The first head and ears of the future bunny. Why glue the two ovals in their lower part from the outside. One oval will be the eye, and the second will be shaped like a circle - it will be the head.
Step 2. We glue the second eye to the head. In order to get the upper paws, we tightly squeeze another cardboard oval. It can even be gently glued in the center and glued to the bottom of the head.
Step 3. Next we attach the trunk to the upper legs. It, too, needs to be as round as possible, like the head of a hare. Finish the figure of the lower legs, which need to be glued in the same way as the ears, and give them an oval shape.
Step 4. If you made a hare from plain or plain cardboard, then after it has dried it can be colored. To make the article more interesting, you can paint all or some of its inner sides in colors that contrast with the outer shades.
Step 5. On the neck of the bunny you can glue a small bow or a bright button. This bunny will be an excellent decoration for the windows. You can make a few colorful hares and with the help of ribbons, passed through the top of the head between the ears, hang them in the window aperture.