New Year's toy Dragon
 They say that the best gift is a gift,made by own hands. And they say that the gift-symbol of the coming year will certainly bring good luck. And why not combine these two opinions? Self-made sewn New Year's Toy Dragon will be doubly a wonderful gift!
New Year's toy The dragon, which we propose to sew, differs from the soft toys that are familiar to us. It does not keep its shape due to filler, but thanks to rings made of fabric strung on an elastic band. Such a dragon turns flexible and mobile.
To make this toy you will need the following materials:
2 m of cloth with a width of 120 cm;
2 m of hats;
4 buttons (they will serve as fixatives for the rubber band);
a square of foam plastic with a side of 30.5 cm;
a square of dense yellow felt (thickness - 12 mm) with a side of 15 cm;
84 grams of polyester filler;
2 buttons for the eyes.
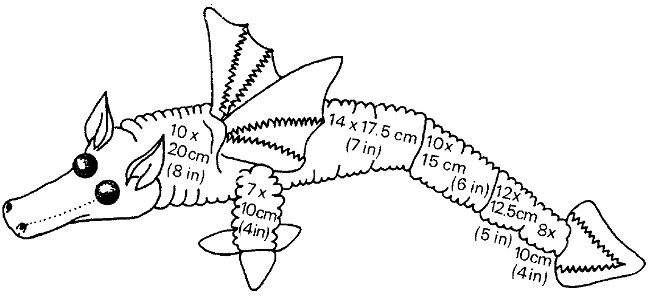
 To begin with, cut out patterns for the head, ears,wings and tail according to the scheme (see the figure). You will also need stencils for circles of cardboard of different diameters: 20 cm, 17.5 cm, 15 cm, 12.5 cm and 10 cm. Thus, you will get a New Year's toy Dragon about 66 cm in length. Cut from the fabric of the blank for the head, wings, ears and tail, as well as circles on the stencils made. You will need 12 circles with a diameter of 20 cm, 14circles of 17.5 cm, 10 circles of 15 cm, 12 circles of 12.5 cm and 22 circles of 10 cm. You can see on the diagram at the bottom of the article how these circles will be located. Two circles with a diameter of 20 cm leave for the paws.
Start with making circles from body tissue, because this is a long process. Assemble each circle on the thread along the edge, tightenand secure the thread. Spread the circles between the fingers so that the discs are made, then puncture the center of each disc to get an opening in front of the threaded section. Through these holes you will put an elastic band that will hold all the disks together.
Cut a piece of rubber with a length of 127 cm and stringon the rubber button. Move the button just in the middle of the elastic band and fix it in place with the knot. Now thread both ends of the rubber band in a big needle or awl and start forming the dragon's body. Begin to move from the shoulders to the tail, first threading large disks, and then - smaller ones. Having finished stringing, tie a button to the rubber band.
Fold the halves of the tail parts face-to-face and stitch together. Turn out the front side outward, cut offpiece of polystyrene to insert into the tail. Sew the tail along the guide line shown on the pattern. Place the tail opening above the button at the end of the body and then sew the last circle of the body to the tail so that the button is inside the tail.
Make wings by sewing them from two pieces: fold them upside down, sew not to the endand unscrew. Cut out two pieces of foam in the shape of the wings and insert them inside each wing. Sew the holes left in the wings, and sew them to the tenth disc in the dragon's body.
 Cut a piece of rubber with a length of 46 cm and fasten it incenter button, like you did with an elastic band for the body. String 7 discs for one leg, pass the rubber band between the ninth and tenth disc in the dragon's body, string 7 discs for the second leg and fasten the end of the gum with the last button. Each foot is made from a circle with a diameter of 20 cm. Collect the circle on the thread and make from itflat disc. Fold the edges of the disc to the center to make a triangle (see the picture). Attach a button that secures the elastic band on which the leg is assembled, under the folded edges of the disc. Now, sew the foot to the lower disc of the leg so that the button is not visible and securely fastened. Make claws of felt - three for each leg - and sew them.
Sew a detail for the chin (chin gusset) tofor the head gusset on the underside, aligning points A and B. Sew the cheeks for the cheeks on each side of the head, then insert the finished part between the sides, aligning points C, and sew. Turn out the head face outward and tightly fill the filler in the area with the details of the chin. Sew the hole, at the last moment inserting into it the button that fixes the elastic band at the beginning of the dragon's body, and tightly securing it.
Make the ears by sewing the two pieces of the wrong side outwards, and then turning it around, and sew them into place. Sew a button-eye to the head. New Year's toy Dragon ready!