Modular swan origami: step by step instruction to create a modular swan origami with photos and videos

Modular origami is a way to create a voluminousthing of paper. This art came to us from China and gained a lot of admirers. Collecting figures is necessary for a certain technology, so that the structure is strong. If everything is done correctly, then the product will turn out to be beautiful and persistent.
Swan of modules - step by step instruction with photos and videos
This technology is based on modules thatare made from a landscape sheet. To make it, you need to cut the sheet into 32 equal parts. Each leaf should be bent in half 5 times, and then cut along the fold line. After the preparation of the material, you can find a step-by-step scheme of origami swans from the modules and go to work.
Lilac origami swan will be excellentdecoration of the house. To create it, you need 1111 parts, that is, 36 album sheets. Of these, 937 modules should be lilac, 136 - blue, 1 black and 1 red. When they are ready, you can start to collect hand-made articles. A step-by-step diagram of the swan from the modules will tell you how to proceed.
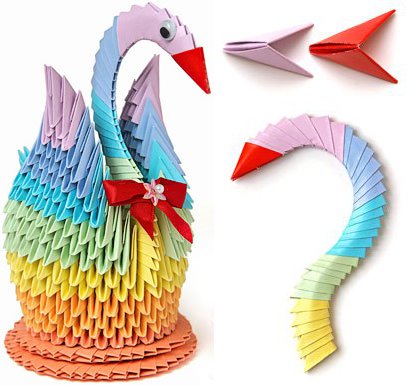
First, create a chain like in the photo:

Close it in a circle and begin to build up the ranks. They will need 11 at the moment. The thoracic part should be done as follows. Put on 1 blue, 8 lilac and again 1 blue. Then continue, focusing on the photo:

Make a necklace of 18 layers. Alternate the blue and lilac shades. It should look like the image:

Now you can go to the head. Colors again alternate among themselves, and complete the figure with black and red. After that, the bird's head will be ready.

For the tail, you need to build up rows,lifting them up. They must be tapered to the end so that only one module remains in the last one above. If desired, you can make a stand. It is made of three layers, closed in a circle. It will take 135 pieces of paper.
If everything is done correctly, it will work like the picture:

In order to understand the process of creating a bird, it is recommended that you read the training video.
Swanish princess-origami - step-by-step instruction with photo
The swan princess looks like a king, becauseIt has a bright color, a chic tail and exquisite appearance. To make it is not more difficult than an ordinary origami bird, if you follow the instructions. In total, 166 green, 680 blue, 615 snow white, 335 orange parts will be needed.
The base of the tail consists of 30 parts, then it should be spread out like in the photo:

Alternating shades among themselves, it is possible to receive brightpattern. It will be necessary to make feathers - 8 small and one large. After that they will have to be fixed on the tail. Collecting, it is necessary to repeat the figure as in the photo:

For the basis of the trunk, 36 pieces of paper are used, then everything is laid out in a circle and so on until the 11th row. After that, you must start to narrow the product to the top.

The neck is made up of 25 rows, the colors alternatebetween themselves. For the beak, you must use one red and one black module. When making wings, the layers will need to be narrowed to the top. The same goes for the tail.

For the stand you will need to use 39 paper parts, it should be from 3 different shades. You should focus on the picture:

The finished product is fixed to the stand with an adhesive thermo-gun. Look at the Swanish princess origami should be something like this:

Double swan from modules - step by step instruction with photo
To create a bird, you need to prepare 1332 whiteparts and 180 pink. It is recommended to start collecting from the trunk, gradually building up the layers. In total, they should be 15, after which you can go to the neck, wings and tail.
For the neck and tail, it is worth using pink pieces. These details are placed opposite each other as in the picture:

Wings do first of 10 rows, and then gradually reduce by 1 piece of paper. It should look like this:

Now make a stand, fixing it with glue:

It remains to form internal wings. They need to be narrowed to the top, so as a result came out as in the photo:

You will also have to make an internal bet, on the image it is located on the right:

Connecting the details, you need to make a neck and head. It is desirable to fix everything on the glue. It is recommended to make a beak from 1 black module and from 1 red. If everything is done correctly, the article will look like this: