Modular origami, animals: assembly schemes, attachment modules, a detailed description of works with modular origami

Modular origami is one of the mostpopular modern techniques of needlework. From several separate paper parts (modules), you can collect various figures of animals, flowers, people, cartoon characters, etc. You need to fold them according to a certain pattern, as the parts are not stuck, but inserted one into the other.
This kind of entertainment is liked by both children and adults,helps develop creativity, imagination and fine motor skills. Modular origami - an excellent simulator of memory, assiduity and spatial thinking.
Crafts from paper in the technique modular origami

This technique first appeared in Japan, butgradually gained wide popularity and popularity all over the world. Connecting the small parts, you get different designs. This entertainment has little in common with the assembly of the Lego designer. Parts can be either flat or bulky. To create an animal figure in modular origami technique, you will need a lot of separate elements and a certain practice in their creation.

Crafts from triangular modules: schemes and step-by-step instruction

Before you learn how to add beautiful and bright animal figures from paper, you need to master the technique of creating individual small details. The assembly diagram is as follows:
a sheet of paper is folded in half;
outline the fold line (just bend and straighten the sheet);
angles bend to the central part;
turn the sheet to the other side and bend the free ends up;
again turn the module to the other side and bend the corners down;
turning, bend the edges, unbending the corners;
edges bend upwards, we hide the corners below;
fold the workpiece in half and our module is ready.

If you plan to make a medium-sized figure, you will need a fairly large number of parts. Mounting them together can be done in several ways:
On the long sides;
On short sides;
One module on the short and two on the long sides.

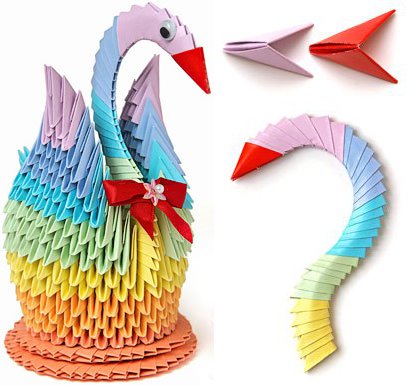
Modular origami of triangular modules: mouse - assembly diagrams

"Mouse" - a very cute and cute figure,is assembled from triangular blanks from the bottom to the top. The eyes, nose and tail are additionally made from cut colored paper. To create this animal you will need the following tools and materials:
Simple triangular parts - 104 pcs. gray, 33 pcs. white;
Square billet - 4 pieces of yellow, 2 red and 5 pcs. gray;
Color paper of white and black for creating the nose and eyes of the mouse;
Scissors, PVA glue;
Toothpick;
The pencil is simple.

When all you need is at hand, you can start assembling the crafts. The process of work is rather laborious and long, requires patience and perseverance.
We create the initial series of 24 parts. Internal - 3 white and 9 gray modules, external - 4 white and 8 gray.
In the third row, hang 5 white and 7 gray triangles.
Perform a turn. Please note that broaches must be located on the outside of the figure.
Assembly diagram:
N.R. - 24 (17 gray and 7 white) modules (hereinafter SM and BM);
3rd row - 7 CM 5 BM;
4 th - 6 сМ and 6 БМ;
5 th - 7 сМ and 5 БМ;
6th - 8th SM and 4 BM;
7th - 10 SM and 2 BM;
8th - 10 CM and 2 BM;
9th - 12 CM;
10th - 12th CM;
11th - 6th CM;
12th row - 6 CM.
We design a mouse from triangular modules
Taurus mouse is ready, it's time to giveattention to design and small details. From red and yellow modules you can make a piece of cheese. With a simple pencil, you can draw holes on it so that it looks as true as possible. The paws and ears of the animal are collected from additional gray triangles and inserted into the figure. The tail and eyes are cut from ordinary colored paper and fixed using PVA glue.
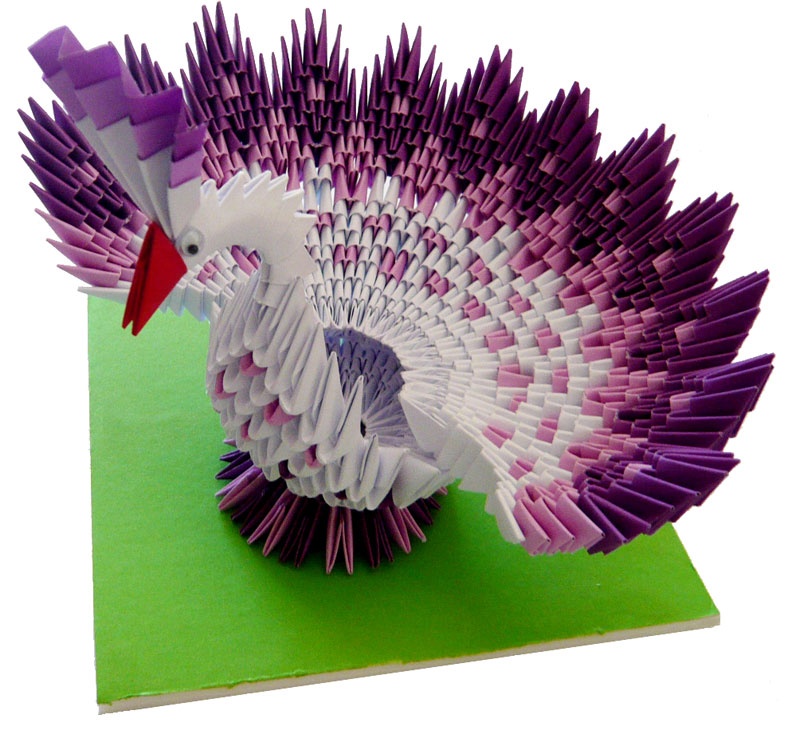
Using such schemes it is possible to easily createfigurines of different animals - penguins, elephants, dogs, cats, peacocks, etc. Detailed master classes and videos are available on the Internet in free access. Do not be afraid to dream, and to realize your ideas. Over time, you may have a whole collection of handicrafts made in this technique.