A crocheted toy, a knitting pattern for beginners. Toy crochet, step by step instruction

A toy made by my mother's hands is excellenta gift for a kid of any age. And if she is also developing, then she simply does not have a price. Therefore, if you are a little acquainted with a crochet and want to please your child with a useful toy, then our master class is for you. We suggest you get acquainted with amigurumi - the technique of knitting funny children's toys by the example of a cute teddy bear, which will become an excellent friend for your baby.
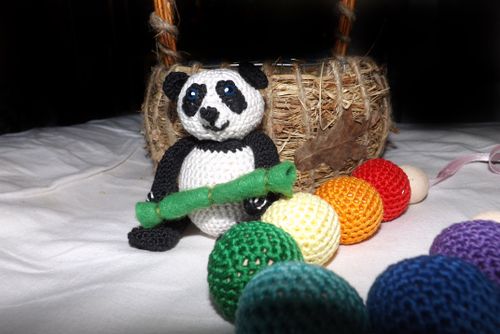
Toy crochet "Panda" - step by step instruction
Amigurumi can be knit with both knitting needles and crochet. But toys made by crocheting are more elegant and textured. Especially interesting are small animals, for example, a panda bear. In addition, the scheme of a panda toy in the amigurumi technique is quite simple and even novice needlewomen can master it.
Necessary materials:
cotton yarn (black and white)
hook
green felt
little bag
medium-sized peas
balloon
glue
scissors
Main stages:
Head Toys
We begin knitting from the head. We connect the ring with amigurumi from 6 loops. To make an amigurumi ring, it is necessary to twist a thread on the finger twice and through this ring to tie 6 columns without a crochet (RLS). Will only pull the edge of the thread and tighten the ring, and the last RPS tie in the first loop. Thus, we get a circle without a hole inside. This is important for the appearance of the product. You can also first make a pigtail, close in a circle and tie it in 6 RLS (but in this case, the hole may remain).
Next, we knit in a circle without lifting posts without a napkin according to the following scheme:
1 round: 6 СБН2 circle: 12 СБН (2 СБН in each loop)
2 round: 12 sc (2 sc in each loop)
3 circle: 18 RLS (we add columns through 1 loop)
4 round: 24 RLS (we add columns through 2 loops)
5 circle: 32 RLS (we add columns through 3 loops)
6 laps: 32 sc
7th circle: 40 sc (add bars through 3 loops)
8-11 round: 40 sc
12 circle: 32 RLS (reduce the number of bars, tying 2 loops together through 3)
13th round: 32 sc
Round 14: 24 RVS (penalties after every 2 bricks)

On the 14th round you need to fill your head so that it is goodwas holding a uniform. To do this, you can use different fillers (cotton wool, sintepon, holofayber, fabric, etc.). In this case, we use a small bag (it will rustle when the child plays with the toy, thereby causing interest and developing motor skills). We roll the packet into a ball and place it inside the head.
Then we knit according to the scheme:
Round 15: 16 RLS (1-loop payout)
16 laps: 12 RLS (2 pivots)
17th round: 12 sc.
We finish knitting and hide the thread inside the head.
Torso of a knitted panda toy
Next, we knit the body according to this pattern:
1 round: 5 sc
2 round: 10 sc (2 sc in each loop)
3 circle: 15 RLS (we add columns through 1 loop)
4 circle: 20 RLS (we add columns through 2 loops)
5 circle: 30 RLS (we add columns through 1 loop)
6 circle: 40 RLS (we add columns through 2 loops)
7th circle: 45 RLS (we add columns through 7 loops)
8-12 round: 45 sc
13 circle: 40 RVN (reduce the number of posts by tying two loops together through 7 loops)
We fill the torso so that it retains itsshape. In this master class, an air balloon filled with small peas (mash) was used. It is easier to insert the ball in the trunk immediately and pour the mash into the ball. Thanks to this filling, the body of the toy can take a different shape (more spherical or oblong).
We continue to knit according to the scheme:
14th circle: 36SBN (we decrease through 8 loops)
Round 15: 32 RVS (decreases every 7 loops)
Round 16: 28 RVS (decreases every 6 loops)
Attention! On the 16th circle, change the white thread to black. To avoid the step that is formed during the usual change of threads, it is necessary to do the following: remove the hook from the working loop, insert it into the next loop, which will be sewn, then into the working loop and pass through the two loops a thread of black color.
Circle 17: 24 RVS (decreases every 5 loops)
18 lap: 20 RLS (decreases every 4 loops)
Round 19: 16 RLS (penalties every 3 loops)
20 lap: 12 RLS (decreases every 2 loops)
21 lap: 8 RVS (1 pound reduction)
Close the knitting and leave 20 cm of thread so that you can sew the body to the head.
Details and assembly of crocheted crochet toys
Sew the trunk to the head. Then make a panda eye. First we embroider the contour, and then fill it with black threads all inside it.

Now we connect the panda ears according to this pattern:
1 round: 6 sc
2 round: 12 sc (increments in each loop)
3 round: 12 sc
4 round: 12 sc
Close the loop and leave the tail of the thread to sew the ear to the head.
We knit a teddy bear a nose according to the following scheme:
1 round: 5 sc
2 round: 7 RLS (increments every 3 loops)
3 round: 11 RLS (tie two RLSs to the first loop, then 3 RLS, then increments one loop to each next loop)
4 round: 11 sc
5 circle: 2 RLS (this circle has only two RLSs, because we strive to make the muzzle not round, but oblong, like a real panda).
We finish the knitting and leave the long edge of the thread to sew the muzzle to the head. Sew the muzzle oblong side down and embroider the nose and mouth.
We pile the front paws according to the following scheme:
1 round: 6 sc
2 round: 12 sc (increments in each loop)
3 round: 12 sc
4 round: 9 RLS (penalties through every 2 loops)
5-20 round: 9 sc.
Close the loop and leave the thread to sewhands to the trunk. In this case, the panda's paws are not stuffed. The hind legs of the panda are slightly thicker. We begin knitting not with an amigurumi ring, but with a chain. It is necessary to tie the oval (foot of the paw). We knit the paw according to the following scheme:
1 circle: a chain of five loops
2 circle: we sew from the second loop of the chain 3 RLS, and in 4 loops we sew 3 RLS and again 2 RLS, and in 3 loop - 3 RLS
3 circle: 14 RLS (again we make increases at the edges of knitting)
4 round: 18 RLS (increases, as in the third round)
5-7 round: 18 sc
8 circle: 15 RLS (we subtract the bars from one narrow side of the oval 3 subcircles to form the transition from the foot to the leg)
9th round: 15 sc
10 lap: 12 RLS (penalties, as in the 8th round)
11-16 round: 12 sc
17 circle: 12 RLS (on the inside of the leg to turn knitting in the other direction)
18 circle: 11 RLS (the first two columns to be tied together)
Round 19: 10 RLS (as the 18th round)
Round 20: 9 RLS (as 19 rounds)
21 round: 8 RLS (as 20 round)
22 circle: 6 RLS (from both sides cut along the loop)
When you knit a second paw, then its upperpart must be done from the opposite side, so you can see where the right paw is, and where the left one. Such adjustments were made in order for the paw to fit well against the rounded body of the panda.
Now let's make panda toyswere rotating. For this we will link two "buttons": they consist of 10 RLS, which are tied around a chain of 4 loops. We pass each button through the upper part of the paw and sew it to the trunk.
In conclusion, we knit the panda's tail according to this pattern:
1 round: 4 sc
2 round: 8 RLS (increase in each loop)
3 round: 8 sc
Sew a tail to the body of a panda.
To make the panda look more original, to her handsyou can put a stick of bamboo. To make it very simple: take a rectangular piece of green felt and twist it, then tie it in three places. Stick a bamboo to the paws. You can also supplement the toy with eyes to revive its appearance.


On a note! Eyes for knitted toys can be bought, and you cando it yourself. In this master class, two small halves of a pea act as eyes. At first they were painted with blue nail polish, and a black circle and a very small white drop were placed on top. Glue these eyes with glue.