How to sew a pillow-letter with your own hands, master class. Original pillow, step-by-step photos, video.

Decorative pillows have long won heartshousewives, their practicality and beauty. Pillows and letters are very popular for children's rooms. Such a pillow can be made together with the child at home or presented as a surprise gift. The process of making such a decorative element takes a lot of time, but the result will please both you and the person to whom you give it. The pillow will turn out soft, bright and beautiful. In this article we offer you a master class, how to sew a pillow-letter with your own hands, and step-by-step photos, videos.
Necessary materials:
Fabric of 2 colors for the front and back;
Material red satin and yellow cotton - for the side;
Threads - black and gray;
Paper;
Marker;
Scissors;
Filler - cotton wool;
Needles for sewing №4.
Pillow-letter - step-by-step instruction
First you need to make a pattern on paper, since my letter is symmetrical you can make a pattern half the pillow, as shown in the photo.
We fold the fabric of the front part in half, apply a pattern, circle.
Cut, do the above again andwe get 2 identical parts - this is the front part and the back of our letter-pillow. For the lateral part, cut the line 10-15 cm, depending on the desired width, we have - 15, taking into account the addition to the seams.
Please note: for convenience and to ensure that the edges of the fabric are not separated, I advise you to bend the edges of the cut out parts by 5 mm 2 times and iron it, as is shown in the video.
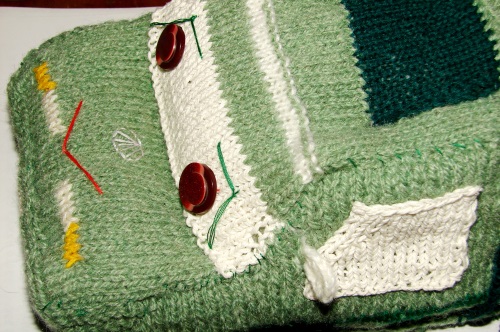
Then, you need to sew parts with temporary stitches. This stage can be seen on the video.Please note: the seams of temporary seams should be contrasted to the fabric, and the seams themselves at the maximum distance from the edge, but not beyond the bent edges.
The stitched letter can be seen on the photo.
To the note: places like "a hole in the letter A, you should sew only to the front, and to the back sew only at the very end of the work.
Next, sew on the prepared seams on the machine, or manually, as it is more convenient, but so as not to touch the temporary stitches, since they are then removed.
Remove the temporary stitches.
We turn out the letter.
We fill our pillow-letter with cotton, you can choose any other filler, at your discretion.
We make the final seams, I have a hole through which I filled the letter.
Our surprise cushion is ready!

It's so easy to sew a pillow-letter with your own hands. Good luck.