Master-class "Autumn crafts made of natural material. Applique "Tree of leaves" »

At school you asked to do an odd job or just want toto deal with your child's creativity? The detailed and accessible master-class "Autumn crafts made of natural material will help you. Applique "Tree of leaves".
Crafts from autumn leaves - a good waydevelop your child's imagination. Joint work will bring pleasure to both adults and children. In addition, beautifully and accurately executed applications or panels can be an excellent addition to your interior. We suggest you make a three-dimensional tree and use for it colorful colorful autumn leaves. For this work, you do not need stinging objects, so it's absolutely safe, and you can do this even in a kindergarten. The only difficulty is that the leaves should be already dried, so they need to be prepared in advance.
Necessary materials:
- White plasticine or gel latex adhesive
- at will: plasticine of any color, if you want the tree to be more stable. Use the old clay, which has remained from previous works, you can even take dirty pieces.
- Light brown paper kraft package (suchpackages are used in cafes or fast food restaurants, where you can take food with you). The scale of the resulting tree will depend on the size of the packet taken. You can use plain paper in beige color, but it should be two-sided.
- dried oak leaves (preferably maximallyexactly match the color, similar to the color of the package). Quantity - at your discretion, but the more leaves, the fuzzy, thicker and more beautiful the tree will be. It is better to take the interconnected leaves, so this will make the work easier, and the tree will turn out to be more magnificent. If the leaves are wet, iron them with an iron through a cloth without steam.
- 3 hats of an acorn
- berries rowan or any other red berries that will be at your fingertips
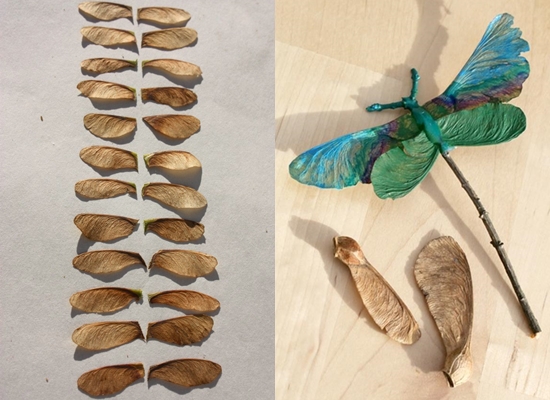
- maple seeds (it is also desirable that they be joined) unripe berries rowan yellow or orange

How to make a tree of leaves, step by step instruction?
- Before working with the package, cut a few strips of paper from it, they are then fit to hold the trunk of the tree.
- Top of the package roll up the tube, and the baseunbend to the same place. The basis of the tree is just paper, so if you want to make the article stronger, weight the bottom of the bag with unnecessary plasticine. Of course, plasticine must be put inside the package itself, so that it can not be seen from the outside.
- Slightly tear or cut the top of the package into strips. Make a semblance of branches. To do this, each strip should be rolled into a flagellum and folded to the side.
- With the help of plasticine or gel varnish pasteoak leaves to the resulting branches. To make the craftwork neat, cuttings of leaves need to be screwed into improvised branches. And for strength, apply clay on both the branch and the leaf itself.
- The trunk of the tree should be sealed with strips of paper of the same material.
- The work is nearing completion. It remains only to glue the eyes, mouth and nose to your tree. In the center of the trunk, attach 2 caps of acorn with plasticine or glue, so that the notches are in front, and put in them one berries. These are the eyes. Make sure that everything is firmly fastened.
- The mouth can be made from the same plasticine by rolling downA small strip and a smile. You can use a red clay, then the mouth is ready, and you can put berries of mountain ash on this strip, then the craft will be more interesting.
- The nose of the tree is made from the cap of the acorn, it is necessary to attach it to the trunk with a notch.
If your package contains logos or other inscriptions and signs, unscrew it.
Your beautiful tree of leaves is ready! Such crafts can be put at home or at the cottage on a table. Of course, your imagination can improve this work. For example, if you make a frightening face instead of a smiling face, then such a tree can easily become a decoration for Halloween, and if you paint the leaves or glue butterflies or flowers to them, you will get a beautiful gift to your grandmother on March 8.