New Year toys with their own hands. Part 2
 Last year, the Country of Soviets was already telling how to make New Year toys with their own hands. We offer you several new ideas to decorate your New Year tree!
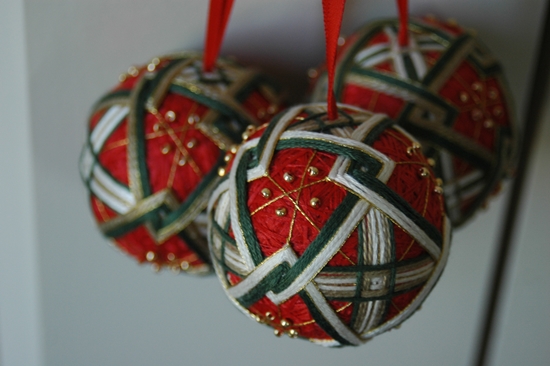
New Year ball of lace and sequins
To make such New Year toys with your own hands, you will need:
- thin plastic bag (food package - "T-shirt")
- multicolored thread
- lace or tulle
- sequins and beads
- needle
- glue
First, crush the sachet to make itball. This will be the basis of your toy. Advantages of the sachet are that it is very light and can easily be shaped. Wrap the base of the ball thread, to get a tangle. The number of threads depends only on the size of the toy you want to get in the end. Try to wind evenly. To ensure that the thread does not unwind, fix it in several places with glue.
Tulle or lace cut into strips in widthabout 2 cm. The width of the strip depends on the size of the ball - the bigger it is, the wider the lace. You can buy ready-made lace ribbons in coils of the right width. Wrap the ball with a ribbon of lace or tulle - the number of turns, again, depends only on your taste. However, the ball should not be too heavy. To better consolidate the tulle, spread the bead with pearls and sequins. In the end, sew an eyelet so that the ball can be hung on the tree.
A couple of small tips:
- the color of the thread and lace depends on how you see your toy: you can make a solid ball, or you can play in contrast;
- so that the ball looks more elegant and beautifully shiny, you can embroider it with a metallized bead.
Christmas wreath
From the West came to us the tradition to decorate the house with Christmas wreaths. A classic Christmas wreath is made of holly branches (holly) and berries of mistletoe (mistletoe), but we will try to make plants more accessible in our latitudes. To make a Christmas wreath yourself, you will need:
- Tui branches (length - 9-13 cm)
- cluster of mountain ash (length - 7 cm)
- thick wire for the base
- thin bands of foam rubber
- wide satin ribbon
- thin wire
- line
- thread
- spray gun with water
Make a wire from the wire for the wreath - toit will be attached branches. Around the base wound thin foam tape. They can be bought in a floristic store - they are used to preserve moisture in plants. In extreme cases, you can use strips of foam rubber, used for insulation of windows. Fix the ends of the foam with a thin wire or line.
Attach the branches of the thuja to the wreath along its entire lengthwith the help of green threads. The ends of the branches should be under the foam. Then in the same way attach and brush the mountain ash with berries. To further strengthen the structure, wind the wreath with a transparent line along the entire length.
Finished wreath sprinkle from the spray: so the branches of tui will keep freshness longer. If the room is dry air, the wreath will be tediously periodically sprayed so that the tuya does not fade ahead of time. At the base is ready a wreath tie a bow from a satin ribbon and attach a loop to the wreath. Christmas wreath can be hung!
Christmas tree of puzzles
If you have children, then in the house for sure there issets of puzzles, in which there are not enough pieces. They can not be collected, and it's a shame to throw it away. From such puzzles you can make excellent New Year toys with your own hands, for example, Christmas trees. To make a Christmas tree of puzzles, prepare:
- elements of puzzles
- paints (for example, gouache)
- transparent universal adhesive
- Brushes for paints and glues
- scissors
- small buttons, beads, beads, etc.
- ribbon (to hang a finished toy)
Color the back side of the pieces of puzzles (one,on which there is no drawing) in green color - it will be needles. And one piece leave brown, from it you will make a trunk. In principle, you can use other colors - you will get an unusual fairy-tale tree.
When the paint dries, lay out of the piecesSilhouette of a Christmas tree in one layer. Then plaster the face (unadorned) surface of the remaining puzzles and glue them with the second layer in staggered order to fasten the adjacent puzzles of the first layer and cover the joints). The more pieces of the first layer are captured by each glued puzzle - the better the tree will turn out. So that it does not fall apart, use more glue.
When the glue dries slightly, turn the tree overthe other side and again glue all joints. Cut a piece of ribbon or decorative lace, fold it with an eyelet and glue it on the back of the toy. Wait for the herringbone to dry (you can dry it with a hair dryer).
On the front side of the finished Christmas tree, you can paste beads, buttons, stars, coins, sequins, etc.
As you can see, beautiful and spectacular New Year's toys with their own hands are obtained even from improvised materials!