How to make a Christmas tree from cardboard: New Year's master class with your own hands

Did not decide which is better to give to their relatives andclose or how to decorate your interior? We will help you. It is possible without special efforts and without investing a large amount of money with your own hands to create an excellent hand-made article. We make a Christmas tree made of cardboard. It's simple, fast, unusual, beautiful. Pleasure yourself and your environment. See the detailed instructions for the photo.
For work you need:
- a piece of paper (the size depends on what kind of big tree you want);
- 2 sheets of thick cardboard (the same dimensions as paper);
- white acrylic paint (or any other firm and dense);
- Green and white gouache (or other thick persistent paint).
- glue Moment (or any other, well grasping and gluing qualitatively elements);
- decor elements (cotton wool, beads, asterisks);
- stationery knife,
- scissors,
- brush,
- sponge.

Step-by-step instruction
- We pass to the beginning of work. Take our sheet of paper, we remind you that its size depends on your desire. The more, the higher and more splendid your work will be. Fold the sheet in half.
- After we folded the sheet in half on oneside, near the bend draw a contour of the future figure. You only need to draw half the spruce, you can show creativity and make the stem wider or thinner, more branches or less, it all depends on you and your desire. Then we do not open the sheet, but on the drawn outline we cut out our stencil. We received the symmetrical outlines of our crafts. Our main stock is ready.
- We pass to the cardboard. We circle our workpiece on a sheet of cardboard. If the cardboard is thick and well will keep the shape when painting our figure (when painting the cardboard is wetted, softened and can be deformed), then we cut out 2 figures. If you doubt that your cardboard will be able to withstand painting and not deform - cut out 4 figures. If you cut out 4 figures, you need to glue each 2 stencils to each other, thus getting 2 Christmas trees. We glue with glue for complete drying. It is possible after applying glue and figurines to each other to put them to dry under the press so that the shape does not change, remains straight. (for example, under a stack of books)
- Now you need to give our herringbone volume. Mark the two resulting shapes (one from top to middle, one from bottom to middle). We made figures of 20 cm high, so our markings will be 10 cm (exactly half the figure), we also need to mark the stripes along the width (the width of our foot is 6 cm, hence the strip will be starting from 3 cm from one edge of the leg). Cut out the resulting markup with a stationery knife on the previously traced strips.
- Then we put our blanks into each other,to form a voluminous form with 4 branches from different sides (add up as a puzzle). We begin preparation for color. We paint our workpiece with white acrylic paint, completely promazyvaya from all 8 sides and without regretting the material used (we can say primer, create a foundation for the final color). If you do not have acrylic paint, then take any other thick, persistent, bright and well-holding color.
- After waiting for our white layer to dry,turn to our real color for a beauty. Now we impose a beautiful green. Also do not regret the material, but do not overdo it. It is necessary that the color was homogeneous, saturated.
- After our green foundation dried up,go to the volume. We take any sponge. Pour the paint into any bowl or you can get it wet in the cone. We moisten the sponge in light green paint (it can be obtained by mixing our green and white paints) and we distribute the dotted movements along the spruce tree. It turned out a beautiful effect of the needles on our branches. Let's further sprinkle our beauty with snow. We take a brush, we dilute it, we dip it into white paint and light strokes, barely touching our figure, so as not to overdo it we apply white paint. You need to do this without much effort. Having dried up, our Christmas tree will get the snow-covered effect.
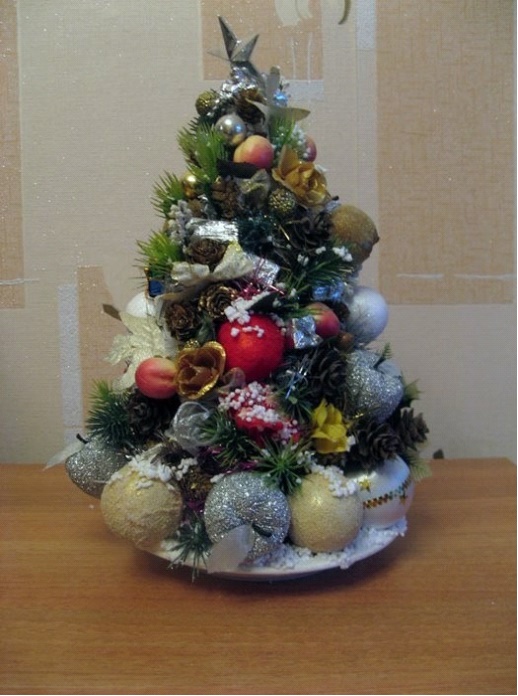
- Then comes the moment of your most importantcreativity. We turn to the ornament of our Christmas tree. We have shown on an example how to decorate with beads. We glued them to the glue Moment. You can paint over the beads with a little white paint (as if they were covered in snow). The other side of the tree is decorated with other elements of decor (we took stars of different sizes and colors). When turning in the wind (if you hang it in the end on a real tree or in the interior) it will be interesting to look at different aspects of your work that differ in their design. To give a more snow-covered effect, stick a little cotton wool.


Our Christmas tree made of cardboard is ready! She is like a real - snow-covered beauty in the middle of the forest. Show your creativity, add something to your interesting ideas, created specifically for you. Rejoice your eyes and those around you on your New Year with your craft.

Read more:
Postcard in the technique of scrapbooking with your hands - photo master-class

How to make a Christmas tree from corrugated paper with your own hands for the New Year, photo

Postcard in the technique of scrapbooking with your hands - photo master-class

How to make a Christmas tree from corrugated paper with your own hands for the New Year, photo

How to make a Christmas tree of cones, a master class with a photo

How to make Russian kokoshnik, master class. Kokoshnik of cardboard with their own hands, step by step photos, video, pattern
How to make a Christmas tree from paper

Crafts for the New Year with their own hands made of paper and cardboard, photo master-class

New Year's articles made of corrugated paper (photo)

How to make a Christmas tree from paper

New Year's articles made of corrugated paper (photo)
Crafts for the New Year with their own hands made of paper and cardboard, photo master-class

How to make a Christmas tree from cardboard: New Year's master class with your own hands
How to make a Christmas tree of cones, a master class with a photo