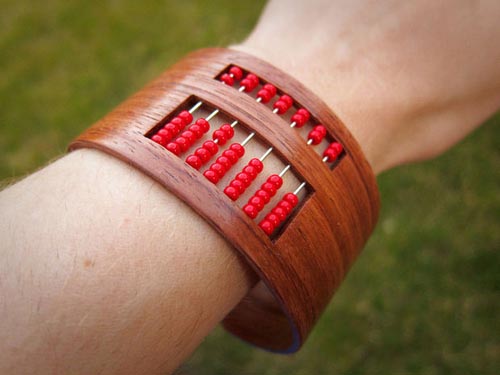
How to make a bracelet with your own hands

An unusual bracelet with built-in accounts, made by yourself, will attract attention and will always be able to replace the calculator.
You will need
Materials:
- thin wooden plywood-veneer (you need 5 pieces 5 cm wide and 20 cm long)
- glue for wood;
- Super glue;
- beads for bills (diameter about 2.5 mm.);
- pins with heads like nails (5 cm long, thickness 21);
- a strip of aluminum (cut from an aluminum can);
- parchment for baking;
- polishing for wood;
- a piece of wood 2x4, 7.6 cm long (for a blank).

Instruments:
- 2 clamps for a hose (clamp) with a diameter of at least 5 cm;
- screwdriver (to secure the clamps);
- hacksaw;
- sandpaper;
- scissors;
- sharp knife;
- metal ruler;
- tweezers;
- nippers;
- bar vice;
- a small brush (for spreading glue);
- drill with a thin drill.
- Make a blank

Cut a piece of wood with a hacksaw under the sizethe future bracelet (for this pre-measure your fist). Cut the inner part is not necessary - you should get just an oval wooden shape.
- Slice thin plywood and aluminum

Using a knife and ruler, gently cut 5strips of plywood - along the length they should be such as to grasp the blank with a small distance between the ends. The lateral edges should be slightly wider than 4 cm. The cleaner the cut line, the better. After cutting 1 strip of aluminum - the same length and width.
- Glue the first two layers
Adjust the clamps along the width of the blank. Wrap both layers of plywood around the blank, cut off excess, if necessary.
Cut off a piece of parchment for baking - a bitwider and longer than plywood strips. Wrap it around the clamp so that the strips do not stick to it. Lubricate one of the strips of glue on the entire surface, attach the top of the second and put the workpiece on the disc.

Then wrap a strip around the whole structurealuminum and secure with clamps. Thanks to aluminum, the clamps do not scratch the workpiece. Turn the clamps so that the screws fall on the empty space between the ends of the strips, and tighten as tightly as possible.
Wait for about 10 hours while the glue dries.
- Glue the middle layer

Remove the clamps and a strip of aluminum, set it aside untilworkpiece. Cut one of the remaining strips of plywood into narrow strips (6 pcs.) 3 mm each. This is the distance between the bars of the accounts. Mark the center of the bracelet and glue three strips on each side of it, at a distance of 1 mm. from each other. Cut off any excess and put the workpiece in the clamps again.
- Glue the last 2 layers

Apply a layer of glue on the entire surface and glueover the penultimate strip of plywood, again placing the entire bracelet in the clamps. While the glue is not frozen, clean from it with a pin a 1 mm hole between the strips of the middle layer. Wait until the glue dries, and add the last strip.
- Round the corners

Remove the workpiece from the blank and round the corners with a hacksaw and sandpaper. Constantly try on the bracelet on hand.
- Cut holes for bills

Before cutting, mark where will bebeads. Measure the length of 7 beads to find the height for the first "window", and 4 for the second one. Add the resulting numbers, subtract them from the total width of the bracelet and divide by three - so you get 3 equal sections. In general, from the edges there should be a distance somewhere in 1.5-2 beads, and exactly the same - between the first and second section of the accounts. Mark the future "windows" on the workpiece with a pencil - just in the place where there is an "average" layer of small strips.
- Cut sections

First, drill a hole in each of them with a drill, and then cut out both sections with a hacksaw. Cut the edges with sandpaper.
- Drill the holes for the pins

In these holes will be inserted pins, on which you need to later bead beads. Drill them between small strips of the middle layer. In total, you will have 7 through holes through the entire bracelet.
- Polishing

Polish (if you want - color) bracelet, modify all sections with sandpaper.
- Pins and beads

Insert the pins into the holes. On each of them strung beads as you move them up - 2 "small" window, and 5 - in the "big". Thereafter, wire cutters, cut the excess part of the pins, so that the entire pin in the bracelet was not sticking out.
- Apply both edges with holes
To do this, use a mixture of dust remainingafter processing with plywood and super glue. Carefully fill all the holes, apply, if necessary, a toothpick. After drying, remove the emery with an extra layer of glue, making the edges of the bracelet smooth. Done.