How to assemble Rubik's cube 3x3, assembly diagrams

Probably, everyone at least once tried to collect a cubeRubik 3x3 - simple in appearance, but in fact a tricky puzzle. The country of the Soviets will tell you how to put it together using special schemes and build algorithms that will be understandable even for beginners.
Rubik's Cube (other names are Rubik's Cube,Magic Cube) is a known mechanical puzzle. In 1974, it was invented by the Hungarian sculptor and architecture teacher Erno Rubik, and in 1975 he patented his invention.

The classic puzzle consists of 26 smallercolored cubes (size - 3x3x3). They can be rotated around axes that are invisible from the outside. The task - to collect a "toy" so that each of its faces consisted of squares of the same color.

Rubik's Cube: assembling the first puzzle belt

The assembly of the Rubik's 3x3 cube for beginners seems complicated, but it is easy to master.
To begin with, let's define the terminology andgive each cube a name. The central cube (center) in the figure is denoted by number 1, the side cube (side) - number 2, the corner cube (angle) - number three.
Important! The main assembly rule is that the front side (front) should not change!

The first belt try to collect yourself - the first side is going as you like, you can show your imagination. After this, the first belt is collected by exchanging the cubes of the first side.
Here are a couple of tips for collecting the first party:
The central squares are always the same in relation to each other.
The white side can not physically coexist with yellow, green with blue, and red with orange.
First, make sure that the first side has the right cross from the sides, then - collect the corners.
Rubik's Cube: formulas for the second puzzle belt
To build the second belt, you may need two formulas.
Rubik's Cube Assembly Diagram - Formula 1  Rubik's Cube Assembly Diagram - Formula 2
It is not difficult to understand these formulas. For example, turning 1 of formula 1 is turning the top side clockwise. And turn 7 of formula 1 - turn the front side counter-clockwise. The turn is always made at 90 °.

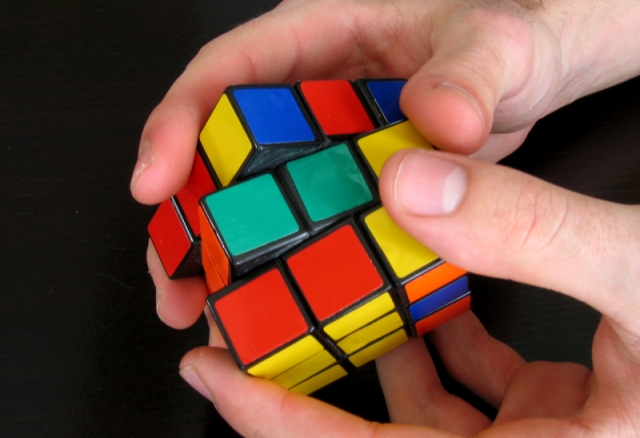
In the scheme for assembling the second belt of the Rubik's cube 3x3fully assembled side with the first belt - an invisible part to your left. Remember: the central cube is always the same color, the side is two, and the angle is three. Frontal side - 4.

First change the side 2 to the 0-1 cube. The color of planes 2 and 4 must coincide. The invisible color of the sidewall 2 when assembled according to the first formula is 5.
Squares 2 and 3 are on the third belt, yetnot assembled. That is, you need to find on the side opposite to the already assembled side panels without the color 6, and by rotating the 3rd belt visible on the 6 side opposite the corresponding color of the first belt.
If the color of the square 3 is the same as the color of the square 5, compile according to the formula 2: in the place of 0-1, put the side 3.
Rubik's Cube: the assembly of the last, third puzzle belt
To build the third belt (the last side) you need three formulas.
How to add a puzzle: Formula 3  How to add a puzzle: Formula 4
  How to assemble a puzzle: Formula 5

First you need to collect the correct cross onthe last side - so sidewalls will occupy the right position. The cube needs to be oriented relative to the sides indicated in blue in the figure. In this diagram, the front side is highlighted in blue, fully assembled - the lower invisible side. In order to collect the correct cross, repeat the formula several times. Repeat the cross when the far cube is positioned correctly and the nearest cube is not.

After that, onlycorner squares. If they stand in their places, but are not oriented correctly - do not follow the following formula. The blue cube in the figure stands in its place. If you do not have any, the front side can be any. After 2-3 repetitions of formula 4, the angles should fall into place.

To correctly orient the corners, useformula 5. In order for the colored blue corner to stand up properly, it needs to be rotated several times. The most important thing is not to change the front side until the cube is completely assembled - even if it seems to you that nothing comes out. If the angle does not rise correctly the first time, again execute the formula. To substitute the next angle, the first step will be as follows:

Video Tutorial: how to assemble Rubik's Cube 3x3 for beginners
To better understand the presented schemes andTo present the process of assembling the Rubik's cube graphically, take the cube in hand and watch the video tutorial. Try to repeat what you have learned. We are sure that now you can easily collect this puzzle!
You have mastered a diagram of how correctly and quicklycollect this most famous puzzle. Of course, there are many more formulas for assembling it in 3x3 format, we described only a few, but after a short practice you will be able to quickly figure out and without the assembly scheme.