How to make a beautiful postcard for the New Year with your own hands, master class with photo
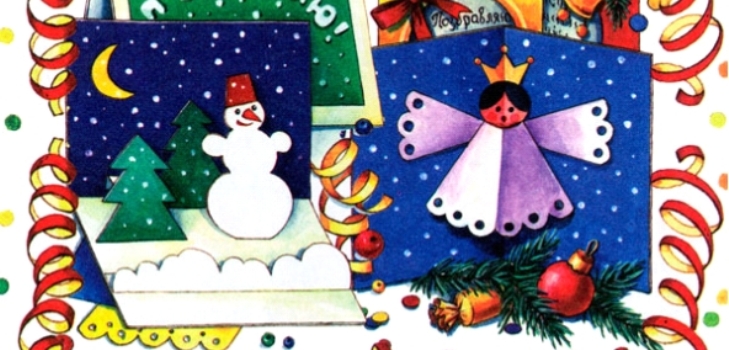
New Year is a holiday on which happenmiracles and all dreams come true when they chime. Twinkling white snow is spinning, from which children and adults mold huge snowmen. In the woods there is a stupefying smell of spruce, around which the children lead round dances. Let's make with you in honor of this holiday the same beautiful, unusual New Year's card with your hands with a beautiful New Year's story - a snowman in the forest. For this we will use step-by-step instructions with a photo.
You can, by using our instructions, create your own story, make a different story. For example: Santa Claus and the Snow Maiden at the Christmas tree, to come up with their beautiful images.
For work you need:
- cardboard (we need yellow, green, white); purple or blue paper.
- scissors;
- pencil;
- Glue Moment or any other - at your discretion;
- watercolor paints (we need white, red, black);
- markers (red, black);
- sparkles (colors at your discretion).
Step-by-step instruction
Let's turn to the production of our original postcard for the New Year.
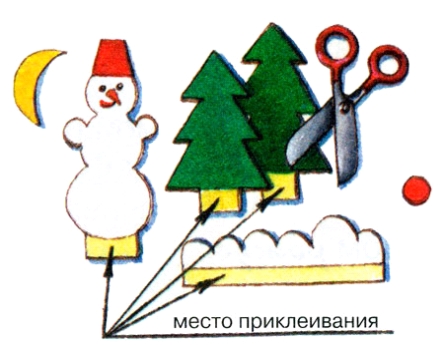
- Let's start with the blanks, and at the same time our mainheroes - a snowman, two trees and a moon; also draw a snowdrift. All the figures are drawn together with the bottom stand (see the picture below), so that they can be pasted into the postcard. The height of the figures should not be more than 13 cm together with the stands, the snow is not longer than 15 cm. The snowman is made on white cardboard, then the nose, eyes, mouth and hat are drawn with felt-tip pens or paints. Christmas trees on a green cardboard; snowdrift, like a snowman on white. Moon, respectively, on a yellow cardboard. Cut out the resulting figures.
- We pass to the very basis. We take a cardboard in the size 15x30 cm and bend it in half. Prepare our sky: on half of the cardboard (before the resulting fold) we paste purple or blue paper. Then on our skies we will stick a fairy yellow moon. Glue must be carefully, leaving no traces on our application. Stands for our figures, which we have specially left to add and paste on the bottom of the postcard. Stick only the supports. Our blanks are face down (see picture below).
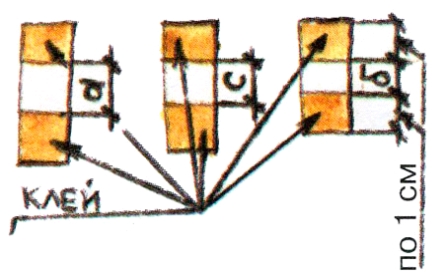
- Further we pass to gradual giving to ourworkpiece volume. Cut out three paper strips with a width of 1 cm. The segment (a) is 6 cm, the segment (b) is 2 cm, the segment (c) is 4 cm. We divide each strip into three parts so that the edges remain 1 cm after each segment (a, b, c) (see the figure below). The length of the middle part can vary according to your desire (the length of the segments (a, b, c)), this will depend on how much you want to remove from the background your workpieces.
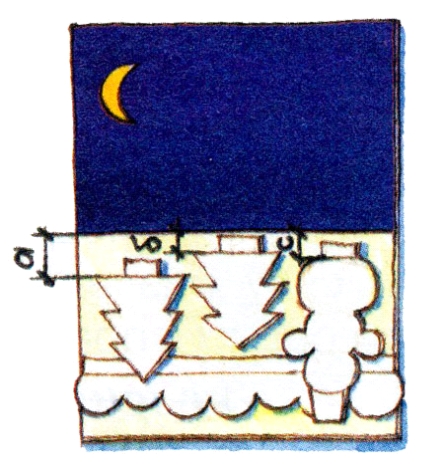
- Draw against the background of the snow with white colors. Then we glue our workpieces to the background on our strips, made in the previous stage. The edges are glued in turn to the workpiece and the background. By this technique, we glue our snowman, two Christmas trees. Straighten our drifts and bend to the background to create a volume.
- Inside the work is finished, we created the volume andColor, we proceed to the exterior design. From the outside, we glue colored paper of green color, paint with snowflakes (if desired, sprinkle with sparkles). It remains to write our warm wishes for the New Year!
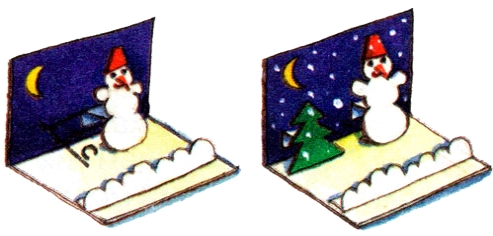
Our unusual postcard is ready! It will be a wonderful gift for the New Year. Bright, voluminous. On the basis of our recommendations, you can create your own unique craft with your storyline. Good luck! Rejoice your relatives and loved ones with such wonderful gifts more often!

