Quilling frame for photos, master class. Quilling the frame with your own hands at home

Photo frame bought in the store - a thingboring and faceless. It's quite another matter, a frame made with your own hands. It turns out warm, touching and very sweet. For example, the photo frame made in the quilling technique is very unusual and stylish, the master-class for manufacturing which we offer you in this article.
Quilling the frame for photos by yourself - step by step instruction
Quilling - an interesting skill, to master whichif desired, absolutely anyone can. The essence of it is to create special modules from twisted long and narrow strips of paper. Such modules in the aftermath can become the basis for hand-made cards, albums, frames, paintings and other compositions. Quilling of photo frames with their own hands looks especially original and does not require any special material costs.
Necessary materials:
mat
knife
ruler, metal
PVA glue
core for twisting elements
corrugated cardboard
strips for quilling, width - 3 ml.
Main stages:
First we cut corrugated cardboard of the right size: length - 47 cm, width - 20 cm.
In order to assemble the frame of the desired shape,its length is divided into sizes: 20 cm - 20 cm - 7 cm. Using a metal ruler, after measuring 20 cm, we make a light notch (we do not cut corrugated cardboard through and through) with the breadboard knife along the entire width of the cardboard. Then measure another 20 cm and make the same incision. Thus, the cardboard must be bent by the smooth side inward.
We retreat from the edge 1-2 cm and cut off, leaving a tongue 4 cm wide.

On the other hand, we retreat from the edge of 1 cm and make a notch in the center 4 cm long (for the tongue). That's the way the frame is going.

When our framework is already on its own,begin to develop its front. To do this, we cut out several templates from white paper, alternately apply them and find the most interesting variant of placing photos.
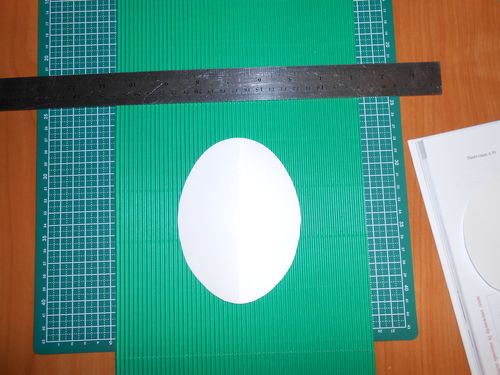

Patterns need to be carefully rounded and cut with a knife.
To refine the sections and give a frame of refinement, from the remaining cardboard we cut off a strip 0.5 cm wide and glue it on the cut with denticles inside.
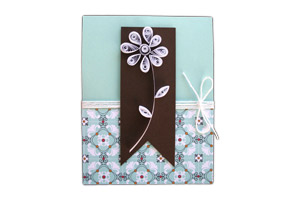
We proceed to the most pleasant - the manufacturepatterns in the quilling technique. All the patterns will consist of basic elements: the middle of the flowers - a tight roll, petals and leaves - a drop, an eye. All elements consist of free rolls.
Squeezing loose rolls into similar elements, wrap them with a strip of a different color and squeeze in the shape of the eye.
Of the three elements in the form of the eye, a very beautiful petal for the flower is obtained.
By the same principle of green belts, we form the blanks for the leaves.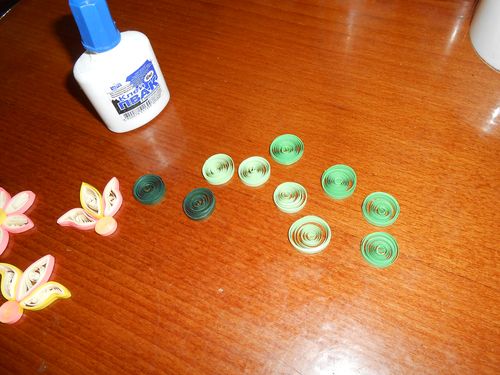

When all the elements are ready, we begin to glue them to the frame in the desired order.


When all the patterns are pasted, you only have to place the pictures.
That the photo could be changed, we will notsticking. To fix the photos we use the corners, which are glued along the edges, forming a pocket. Noting the boundaries of the photos, we paste the corners. These photos are not cut off, that's why they are slightly in contact, but this is not a problem - in these places the corners will be replaced by a strip.
That's all - a beautiful and original quilling frame for the photo is ready!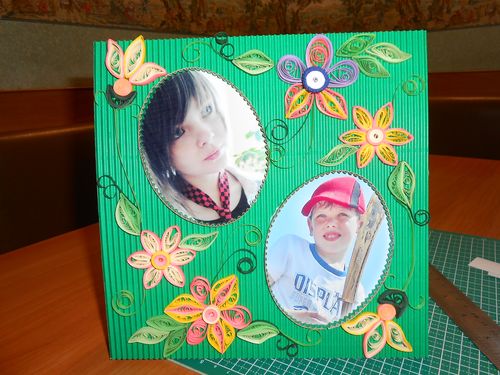
Read more:

Cardboard frame with your own hands: photo, original design of cardboard photo frame, master class

Frame for a photo in the technique of decoupage

Photo frame Fresh news
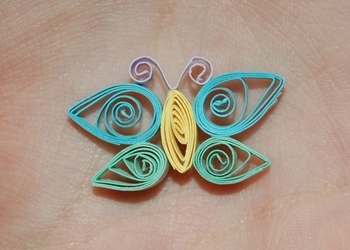
Quilling butterfly, master-class, step by step instruction with photo
How to make a postcard in the technique of quilling, step by step instruction with a photo

How to make a quilling rose, step by step instruction with a photo

How to make a quilling heart, step by step instruction with a photo
Frame for a photo in the technique of decoupage
Photo frame Fresh news

Quilling butterfly, master-class, step by step instruction with photo

How to make a postcard in the technique of quilling, step by step instruction with a photo
How to make a quilling rose, step by step instruction with a photo

How to make a quilling heart, step by step instruction with a photo

Quilling frame for photos, master class. Quilling the frame with your own hands at home