Developing toy for the child with their own hands. Soft book for baby, step by step instruction

Soft developing book will like it very muchchild, because it is a multi-function toy. The pages of this book are full of surprises: you can move the boat, hide the sun behind the cloud, find the bug behind the leaf, go through the beads, feel the tail of the cat and even feed the mouse with cheese! The toy is designed for toddlers from 6 months to 2-3 years.
Developing toy with their own hands - step by step instruction
The book offered in this master class is not onlyfascinating, but also a cognitive toy. The development of speech, fine motor skills, memory, attention and perseverance with a far from complete list of its positive qualities. And, most importantly, you can do it yourself with your own hands at home, without resorting to special financial expenses.
Necessary materials:
|
|
Making a frame of a soft book
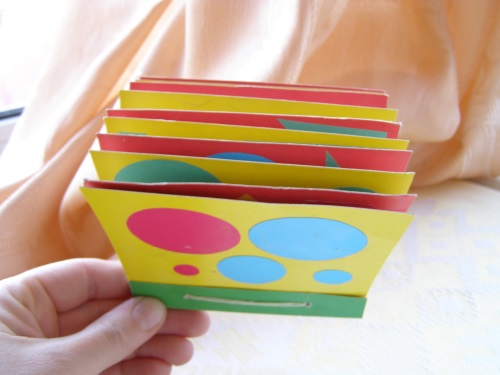
Let's start with the basis of a soft book - pages. They will require an oilcloth and cloth. The title page is wider and longer than the rest, the second page is 1 cm smaller on all sides. The others only decrease in length (each shorter than the previous one by one centimeter). We cover the glue on both sides with a cloth. Turning can be done in one color solution, or by combining different fabrics.


Ready pages are stacked in descending order. We form the skeleton.

Important! The number of pages, as well as the dimensions of thebooks, are determined at personal discretion. A sample from our master class contains 5 turns. The size of the title page is 26X52 cm, the second page is 24X50 cm, the others are 1 cm shorter (24X49, 24X48, etc.).
Folded sheets are stitched in the middle with a dense thread. It is best to make a crochet for shoes.
On a note! The cover of the soft book can be designed in an original way: put a photo of a child, embroider his name, draw a favorite character from a cartoon or a fairy tale.

Sunny morning and a cottage on a soft page
We proceed to the design of individual pages. The plot of the first turn is a sunny morning and a house. For the summer clearing, you need green cloth, artificial flowers, appliqués of insects or small animals (in our case 2 butterflies and monkeys), 7 thin satin ribbons for the rainbow, yellow and blue fabrics for the sun and clouds. It will also require one small Velcro for the sun and blue ribbons for rain.


The house besides the roof, windows and doors has alsoresidents. Be sure to prepare the applications of the kitty, dog and child. For a roof, it is better to take a black cloth (on it a contrasting attic is clearly visible), openwork fabric for tulle, buttons, dense fabric for the door and any bright fabric for the attic.
The basis of the house will be a rectangle of 15 to 20 cm,which should be made of light brown material. The edges of the fabric should be tucked off by pre-brushing a different color. The door will occupy 1/3 of the height of the house, slightly less than half its width and is located on the right. The girl's application should be placed to the left of the door - this will be the window. In the center of the roof is a sealskin seal, which in the future we hide behind the doors of the attic.


The house is fixed on the page, we remove the nametka and we supplement it with details: we sew the tulle over the window, the door, the handle from the button, we form the attic.
Flower, a bee and a butterfly with their own hands on a children's toy
Proceed to the next page. It contains a flower, a bee and a butterfly. On one leaf of a flower were attached multi-colored beads, and under another the beetle hid. The flower can be any color, bee, naturally, black and yellow, beetle and beads at your discretion.


First we make a bee. The bee also requires Velcro (to leave its place and sits on the flower), it is desirable to use tulle or a grid for the wings.


The flower is made in the form of a pocket to the babyit was more convenient to hide a bee in it. The tulip is made of bright crimson color, the stalk is embroidered with green threads, and the leaf on the right is not completely sewn to the page.
The characters of the next page are the apple andcaterpillar. Accordingly, the set of required materials will be as follows: fabric for an apple (yellow, green or red), green foliage, beads and a strong thread for the caterpillar.
You can draw an apple randomly on a fabric or prepare a pattern in advance. Be sure to process the edges. Randomly make 3-4 holes in the apple and pass through them the collected beads.
Sew an apple, and fasten the caterpillar only to theedges, so that they freely "walked" along the entire string. The muzzle can be made from a button, add different details at your discretion (bow, legs, braids, etc.).
Hedgehog on a soft page
The third turn is decorated with a hedgehog, apple-tree andmushrooms. "Hedgehogs" of the hedgehog are made of artificial fur, a nose from a button, and a glazik and a mouth are simply embroidered with the appropriate yarn. On the back of the beast is going to carry prey, so we sew velcro.


The apple-tree foliage is crocheted from green grass "Grass". Barrel of black dermantin, fruits from applications. The largest apple is attached to the tree with Velcro.

Mushrooms can be made in different ways, resorting to both sewing and knitting. Edible fungus is fixed with Velcro.


Frog-toy with own hands
A merry frog who sits on the nextpage is done quite simply. On a thick paper, cut out the pattern of the frog and transfer the image to a green fabric, cut out. Sewing the ready silhouette, processing the edges. The front paws leave a little hanging, we sew the mouth with the tongue and the eyes of the beads or buttons.


To the right of the frog is the blue sea, fish,sailing boat and blue sky. The sea of blue fabric, decorated with wavy braid of the same color. The two upper waves are not immediately sewn, as they will pass through the boat. For a sailing boat you will need a dense fabric, an empty core and an openwork braid. Tape thread on the rod and fix (stitching a strong thread around the edges). Crop the tip of an empty ampoule and in the same way attach the sail to the boat.

From the wrong side we sew another piece of cloth, fixing it only from above, from below and in the middle. Side of the fabric should not be sewn, so as to get into these "tunnels" pass a wavy braid.
Sew these waves around the edges and in a strained shape. This will allow the boat to move when the baby pulls it. Thus our boat can "swim". We finish the composition with the help of fish.

The central turn of the developing book for the child
The central spread has a dark background, and thereforeobjects here are bright and contrasting - a hen and a horse. The hen will be quite bright - with a red comb and an orange wing. We design it according to the same principle as the frog from the previous turn. All the details are carefully processed and sewn onto the page. The wing is attached only at the base, you can always look under it and look at the chicken.


In the neighborhood with the chicken we'll settle a white horse. First, the silhouette of the horse appears on paper, after which it is transferred to the fabric in a mirror image. Internal shape (eyes, nose, tail and mane) is better to draw with a handle, so the contour will be visible even from the front side. Further these lines need to be sewn with a black thread. A lush mane and a shaggy tail are made with the help of white yarn, covering them with elongated loops.


Applikatsiya for children's toys with their own hands
The element that adorns the next page,is an applique made of embroidery. The sleeping child is embroidered according to the scheme starting from the contour. Further we fill the photo with a lighter thread. Padded embroider completely blue yarn. On fabric, we embroider the embroidery with double-sided scotch, treating the edges with a thread of the desired color.


A month and stars can be made of yellow fabric or embroidered on a canvas.


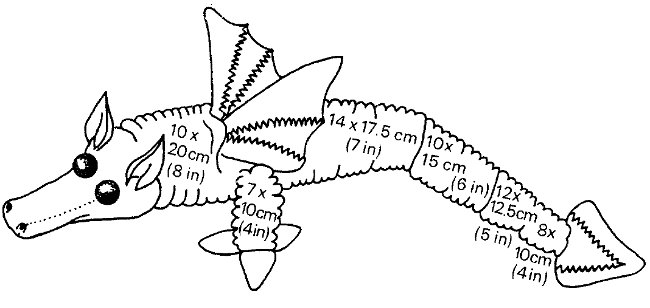
The seventh page is the most exotic, because the elephant settled here. We sew an elephant according to the principle already described with a paper template.

That he was not lonely, next to him we puta palm tree. Leaflets for a palm tree sew from a green fabric, inside each we will place a paste for density and we process edges a seam. The size and number of sheets are chosen arbitrarily. Sewing them only at the base, leaving the upper part free.


Sunflower on a soft page
On the eighth page there is a field withspikelets and sunflower. Field and petals for a flower of yellow fabric, spikelets are ordinary pigtails crocheted. For a sunflower, you should make 5-6 strips of 8 cm. Sew them by folding them in half, thereby making 2 petals at a time. The stalk and leaves can be embroidered with a light green thread, in the center sew a large button of black color.


Spikelets are knitted 5-7 cm in length, leaving hairs on the tips. Sew them on the field, making each awn (a thin long bristle).


Since the ripe harvest should be collected, we will makenext door tractor. The tractor's scheme can be printed or painted, after which it is necessary to transfer the photo to the fabric. Be sure to leave the padding to tuck and hem the edges. The windshield is made white by cutting out the pattern from the circuit. Embroider the inner outline with a black thread.


Wheels are best cut from the skin or dermantinum, then the edges will not be frayed. To give the wheels the power and naturalness will help ordinary lightning.


Kittens for children's toys
On the penultimate spread a couple of funny cats. Paper silhouettes of cats are transferred to the fabric and sew on the page.


Next, we begin to produce tails. Copper wire with a diameter of 0.6 mm is folded in half and twisted together. The length of the tail should be about 15 cm. We wrap the blank with white yarn for knitting and firmly sew it to the page. We fix toy eyes, which can be bought in a store with goods for needlework.


A small mouse becomes a neighbor of predatory cats. It is also better to make of artificial leather, in order to avoid processing the edges. On the body, you must make 4 incisions to pass the rodent through the braid, on which it will move. Do not forget to hide the braid, then make eyes, a nose and sew a tail.


From a yellow fabric we make a triangle, in which we arbitrarily cut out holes of different sizes. Now the mouse can eat cheese.

Ladybug and Butterfly
On the last spread are two largeinsects - a ladybug and a butterfly. For the ladybug we carve a large oval, divide it in half and process the edges of the fabric. For each half we sew 3-4 buttons, sew a zipper between them. The paws are made from the remainder of the same lightning, a muzzle of artificial leather.


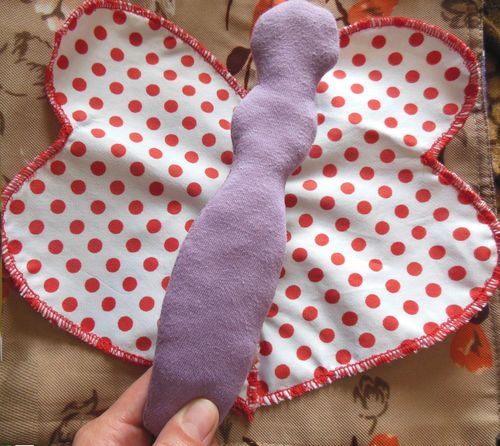
Butterfly is also easy to do. Wings of an insect are cut out by a template and we process the edges with a thread. The body is better to sew from knitted fabric, so that it would be easier to stuff it with a sintepon or cotton wool. The final details are the mustaches, the eyes and the smile. Wings sew only at the base, the upper part of the wing should remain free.


As you can see, developing a soft book for the babymaking at home is not difficult. The main thing is to show imagination and a little patience - then your child will be able to get a unique and useful toy made by mother's hands.