A gift for yourself on Christmas: an angel of polymer clay, a master class

If you are in turmoil, you can not come tothe final choice of a gift for Christmas, calm down. Make yourself an angel of polymer clay. Lighter and nicer can not imagine. He will please your relatives and friends, decorate the interior and the table for this wonderful holiday. Use the step-by-step instruction with the photo, detailed below. Do not regret the time spent, and it will not take too much! It's worth it!
For work you need:

Polymer clay (baked): pink, white, yellow, green, brown, dark pink
Toothpicks
Stationery knife
Working surface (glass, sheet of paper or ceramic tiles)
Wet wipes
Lacquer Fimo (or any other special lacquer for polymer clay)
wooden pot
acrylic paints (gouache)
stencils (you can do without them)
brushes
Styrofoam
sackcloth
tow (you can take linen, straw, bast, or any material of a similar type)
thread
scissors
adhesive Moment

Step-by-step instruction:
Let's cook our pot. You can take already with a certain ornament and drawings, any of your choice. Or, when working, do not use stencils, but rely entirely on your creativity. We used stencils in the form of hearts, strips with leaves. Circle neatly colors in certain places (hearts on the base, stripes with leaves on the edging). For these actions we take brushes of different sizes (for a basis thick, for creation of a volume to a figure more thin).
That hearts looked volume, on lightthe main tone with a fine-sized brush on the side of the figure with neat movements will cast darker shades. The same actions we did with strips on the edging of the pot.
After we finished decorating the pot,we pass to the angel. We take and cut out a conical knife from a foam plastic. Then we begin to crumple the pink polymer clay, after it has become softly rolled out of it a web about 0.5 cm wide and cover our foam completely, the bottom can not be covered with clay.
Fill the pot tightly with a stick, you canuse other similar material. Above they were covered with red petals. Let's stick the toothpick into the bottom of the cone, then set the figure in the pot, so that it stands firmly in an upright position.
Now, from clay, we will mold the remaining parts fortorso of an angel. When going to the next color, you must rub your hands thoroughly with wet napkins or wash with soap. Since clay very easily gets dirty, it attaches to itself dust and all other foreign bodies. All the blanks begin with the manufacture of the ball (knead clay until the moment it becomes soft and elastic and then from the resulting ball we sculpt the workpiece). We attach an oval shape to the brown bowl, we flatten it and use a toothpick or a special knife to separate the top part (higher than half the figure).
Then from the green ball make a small strip, flatten it to a width of about 0.2 cm and divide into 3 parts. Gently use a toothpick to separate the shape of the leaf and make a vein.
Of white clay, we also roll a strip (longer than green), divide it into 12 small parts, flatten each segment. With the help of a toothpick, we make a leaflet on all 12 segments.
Yellow clay is rolled in the form of 3 small balls.
We create chamomiles. Three white sheets are attached neatly to each other, then over the middle of the yellow circle.
In our brown basket, first place the green leaves (see the photo below), then on them daisies.
From a ball of pink color we create hands. We divide it into two parts and roll the strip wider on one side, tapering to the opposite edge. We bend the resulting figure in the middle (about 45 degrees) and draw a toothpick on the bend two bands.
The white small ball is divided into two parts, flatten to a width of 0.5 cm and cut out the shape of the handle.
Now attach our blanks to the calf (see photo below). Do it carefully.
Let's start making the head of an angel. Cut out a circle of foam plastic with a stationery knife. We put a toothpick into the foam. Then cover everything with beige clay (before that you need to roll it out). A little toothpick should also be wrapped in clay, this will be the neck.
From the brown clay we roll a ball, then roll it up to a width of 0.3 cm and cover the upper half of the head. After that, we draw a toothpick along the entire perimeter of the brown clay strip.
From the same brown clay, we roll one large strip and divide it into 4 parts (these will be braids). Strips need to be folded with waves, a toothpick to paint along the strip.
From dark pink clay we make one thinstrip, we attach to the head (above), reaching the end of brown hair. Of the two small balls do the hearts (balls flattened and toothpick we cut out the desired shape).
From pink clay we blind one small strip, draw on it across a pair of strips.
Now we fix all received blanks. We fix the head on the toothpick tightly to the body. Then, to the neck of pink clay, we'll set up the collar, if necessary, cut off the excess. Near the attached dark pink strip on the sides there will be hearts, braids will blossom to the hands (see the photo below).
We make wings out of burlap. We will cut 4 ovals more, 4 less. Cut off their edges. We sew two wings of the same size. From the brown clay blind 4 hearts (how to do them we told above).
Now, with a toothpick, draw our eyes on our face. To do this, we will moisten the edge of the toothpick in brown paint, or gently in the clay and paint a thin layer. Also need a white color (see the picture below).
Now we need to stick our angel out of the pot andbake in the oven. For this, see the instructions that should be on the clay pack. For example, if you use clay firm Fimo, then you need to bake in the oven for 20 minutes at a temperature of no higher than 100 degrees. Do not forget about the 4 hearts that are not attached yet, they also need to be sent to the oven.
After sticking out the figure, let's wait until it cools down and cover with varnish (it is better to take it, a special varnish for the polymer). After the varnish has dried, we put our angel back into the pot.
We finish the image. Using the glue Moment we glue to each wing on the heart, the wings to the back of the figure.
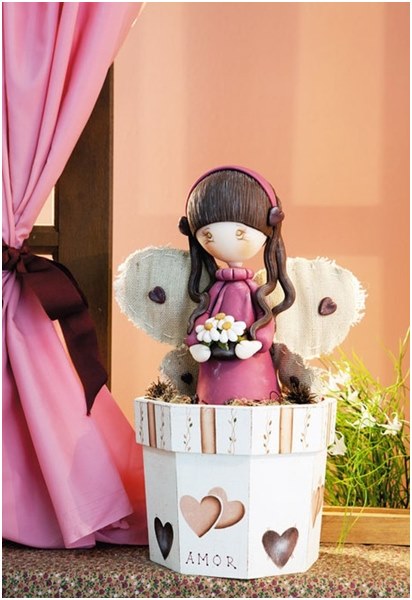
You can use colors of any colors for your taste, ornaments that are more to your liking, embody all your creativity on this pot.
Our beautiful angel is ready! It will decorate your interior, the table, will please your family and friends. Much more gift for Christmas and can not be! Give people a smile and positive emotions!

Read more:

Souvenir "Ovechka" for New Year from polymer clay: how to make, step by step master-class

Gift for yourself on New Year's Eve: snowflake from polymer clay, master class with photo
Molding of polymer clay

Costume jewelery from polymer clay

Bracelets made of polymer clay

How to make a necklace of polymer clay own hands Photo master class

Molding of polymer clay
Costume jewelery from polymer clay
Bracelets made of polymer clay

How to make a necklace of polymer clay own hands Photo master class
Photo master class: beads of polymer clay own hands

Souvenir "Ovechka" for New Year from polymer clay: how to make, step by step master-class
A gift for yourself on Christmas: an angel of polymer clay, a master class

Gift for yourself on New Year's Eve: snowflake from polymer clay, master class with photo