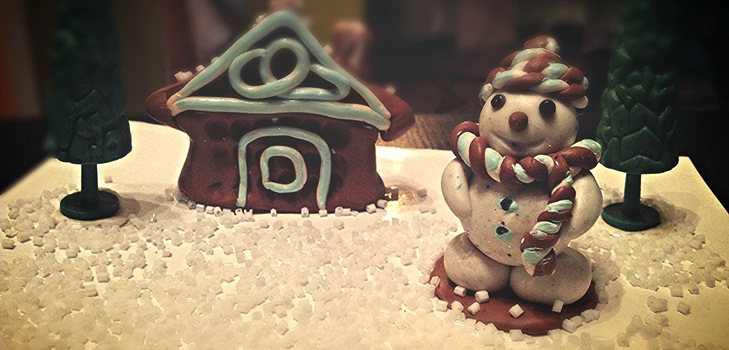
How to make a snowman from polymer clay: a master class

What can you make a snowman? - from cotton wool, from threads, from paper and even from the sock. And a beautiful winter craft can also come from plastics (polymer clay).
A little cute snowman from the polymerclay can be put under the tree, you can hang it like a Christmas tree toy on its branches, but you can make a keychain or even earrings from it - so that the New Year mood always be with you.
Modelers of snowmen differ mainlydetails, they have the same base. But there are two notable differences: you can make a snowman entirely from polymer clay, including all the decorative elements (for example, a scarf or cap), and you can bake the clay separately, and then "dress" the figure in fabric clothes.
Also sometimes the figures are colored, toning them athelp of ordinary cosmetics - then the toy will look more natural, but if you are trying to reverse - for example, a pop art style with bright colors and simple lines - it will, of course, be redundant.
So, you will need:
- An oven for baking a figurine (best with temperature control);
- pallet;
- Strong thick wire for frame and loopsfrom above (you need a loop if you want to use a snowman as a toy on a tree or an accessory accessory, if you're just making a figure, you do not have to make a loop, just cut the excess wire with a wire cutter).
- polymer clay - white, red and blackcolors (colors, however, you can choose for yourself - for example, a pink snowman with bright green details will also look pretty, well, and the red one, required for the cap and scarf, can be replaced by any other shade);
- varnish for polymer clay (to cover the figure at the end, matte or glossy, as you want);
- nippers.
For coloring (optional):
- blush and eye shadow (without any sequins and withoutmetallic effect is very important. Figures are tinted to bake, and if the blush or shadows were mixed, under the influence of high temperature you will get the most unpredictable shades. Ideally, the most simple, cheap cosmetics, from those produced by domestic or Chinese companies, will work. Perhaps, for the skin this is a bad choice, but for painting it's just right).
For clothes (optional):
- thread of a moulinet of the chosen color scale;
- shreds (any fabrics, but better denser);
- thread and needle.
Snowman from polymer clay: a step-by-step master class
Divide a piece of white polymer clay into threesegment of different sizes and gently roll between the palms into three balls. Cut off with a wire cutter a quantity of wire that is equal to the length of your three balls laid out in a row, plus a little more space for the cap, and thread the wire through them. Make a loop, if you want, or bite off excess wire.
Roll a small cone out of red clay andgently wrap up (1-2 mm.) of its edge. Put the cone on the top ball - it's a hat. Roll out the narrow sausage of red and flatten it, and then wrap it around the neck of the snowman - it's a scarf. Make a second sausage, three times shorter length, and carefully flatten its base, turning it into a cone. Attach it to the middle of the upper ball (nose-carrot).
Now roll 5 balls of black clay,of the same size, and attach two eyes and three buttons (down the trunk). Now bake the snowman in the oven, placing it on the pallet; The time of baking, please specify on the packaging of clay, it depends on the manufacturer.
The snowman is ready, it remains to cover it with varnish and givedry. Do not forget to ventilate the room - the smell from baked clay is quite caustic. If you want to paint a snowman, do it until baking. And if you want to dress, sew a scarf and hat separately, and put them on the figure taken out of the oven and lacquered.
Author: Katerina Sergeenko